instructables
Latest

If records were tortillas, they'd sound like this
Time to ditch your vinyl (again), there's a new format in town: tortillas. Intrepid Redditor "UpgradeTech" saw this video, and was bored/inspired/curious enough to see if you really could turn the Mexican food vessel into a record. It turns out, you can. All you need are some uncooked flour tortillas (corn or cooked are too lumpy), and a laser cutter. Well, there's a bit more to it than that (converting audio to vectors, that kinda thing), but tortilla turntablists are, we're sure, willing to go the extra mile to get their classics down on the flatbread format (.tort?).
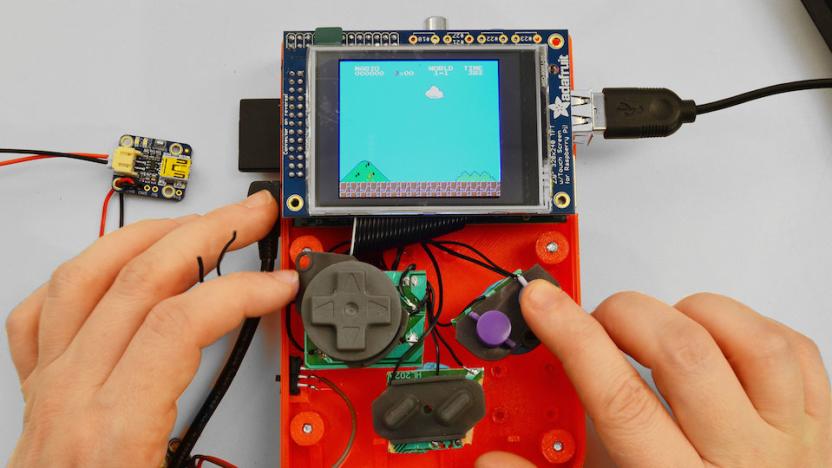
14 ingenious hacks for problems you didn't know you had
People can be crazy, yo. But where there's a will, there's a way that can lead to all sorts of fantastic oddities in the gadget world. Today's community of hackers, makers and DIY fanatics oftentimes work together to find solutions to problems we didn't know we had. They develop innovative products (without all that Kickstarter/Indiegogo hoopla) and often provide open-source instructions for anyone with more can-do attitude than cash. In honor of these ambitious gadget hackers, we've highlighted a few of the more interesting projects from over the years, ranging from the practical to the party starter. [Image: Ruiz Brothers via Adafruit]

Turn a broken iPod into a fashionable, but fractured wallet
Have a broken iPhone or iPod touch kicking around and want to do something with it? If you answered with a resounding "yes," then you should check out this Instructable from 13-year-old member trosen2109 that shows one clever way to recycle the "ready-to-be-discarded" device. Rosen pulls the screen off his broken iPod and tears it apart to remove the internal electronics. With only the shell remaining, he then reassembles it into a nostalgic wallet. As a bonus for owners of older devices, the large 30-pin Dock connector port opening can be used to insert change. The wallet may not be suitable for high rollers with a large wad of cash, but it may be practical as a disguised bank for small amounts of money. It's also a perfect lesson in making and creative electronics recycling.

3D-printed photographs: a new twist on your holiday snaps
Got hordes of old photos you don't know what to do with? Well, if you've got access to a 3D printer, what about blessing them with a third dimension? That's what Instructables stalwart Amanda Ghassaei (of 3D printed records fame) has done using an Objet Connex500, some algorithmic wizardry and a bit of left-field thinking. The images, rather than full 3D renderings, are still meant to be viewed in 2D, but use different thicknesses of print to create a silhouette effect. Ghassaei converts images to black and white, and assigns different printing densities to each grayscale pixel value. The results are surprisingly intricate, and still manage to impart a sense of texture. Fortunately for those interested in doing their own, this is Instructables, so, all you need to do is follow along at the source.

Turning an old Apple mouse into a modern Bluetooth mouse
This Instructable is a pretty sweet project that some of you might want to take on this weekend: It'll teach you how to combine an 80s-era Apple mouse body with the innards of a modern Bluetooth wireless mouse, thus turning Apple's user interface innovation into a device usable with almost any modern day computer. You will probably need to use a Dremel tool and a little glue to make the new mouse's board fit into Apple's old case, but it all seems pretty simple, and in the end, you'll have a sharp-looking retro mouse that uses Bluetooth. The old Apple mouse only has one button, so you'll have to control-click (or download a separate app on Windows) to simulate the right click if you need it -- a small price to pay for clicking around in retro style, though.

DIY cyborg appendage is less exciting than it sounds (video)
When we envision our transhumanist future, it's a little more profound than simply adding a sixth finger... but we suppose you've gotta start somewhere. Instructables user and employee Frenzy gave himself a rather primitive extra digit as part of a project for an Electronics and Robotics class at San Francisco State University. Sadly he doesn't provide step-by-step instructions for building your own cyborg appendage, but it doesn't seem too difficult. Frenzy borrowed heavily from other projects, using EMG sensors to trigger a servo controlled by an Arduino, which he strapped to the back of a glove. Like we said, doesn't seem particularly hard, once you figure out how to get the microcontroller to play nice with the sensors. Obviously this is just one small step step for DIY cyborgs. Next, we need to graph on a few extra arms to make one-man liveblogging a much simpler endeavor. To see Primitive Transhumanism #2: Sixth Finger in action, head on past the break.

Build your own iPhone 4, 4S macro lens
Many iPhoneographers have been looking for a macro lens that will work with the iPhone 4 and 4S to take awesome closeup images. Unfortunately, a lot of those lenses cost a few bucks -- the Olloclip (which also includes a fisheye and wide-angle lens) runs $69.99, and while the magnetic macro lens from Photojojo is only $20, it also leaves a lot to be desired. Now appsman over at Instructables.com has designed a slide-on macro lens holder that can be had for about $15. His design can be printed out at 3D printing house Shapeways for $11.00, and then equipped with a 12 mm PCX glass lens with a 51 mm focal length from Surplus Shed (part number L4471) for $4. The design looks good, and can be used with any iPhone 4 or 4S without a case. Of course, if you're really looking for an inexpensive macro lens for your iPhone, you can always try a water drop ...

DIY iPhone boombox built with a ShopBot
The ShopBot is a sort of an electronic saw, a special setup designed to do some computer-aided cutting and carving work on big planks of board. It's quite useful for woodworking or making things like skateboards or surfboards. Odds are that you don't have one, but nevertheless, just such a device was used to make the plank above, a very basic but still elegant iPhone-powered boombox. I think this is a great idea, though it might be a little more hard to do than a lot of DIY projects. Fortunately, you don't really need a ShopBot to make a boombox similar to this one. You could still follow these instructions, substituting a body created in some other way for the ShopBot board, and use the iPhone dock connector, speaker, and battery pack to serve as the various innards. You can buy plenty of docks that do exactly the same thing, but I like the idea of making one as a DIY project; you can probably build something that matches your own tastes and does practically everything any dock off the shelf will do for you. Maybe this will spark some ideas out there. If you do think of (and make) something cool, definitely let us know.

Open source controller framework lets you add the finishing touch
There are plenty of off-the-shelf controllers out there, but what if you fancy something a little more... you? How about fully customized, with a good seasoning of affordability and style? Design student Alex S has built a framework to help you build just that. The units shown above are for DJ-based programs, but you can create interfaces for any software that takes HID or MIDI input, and as they're modular, create endless ultra-custom set-ups. Keen to dismantle any technical barriers, Alex created a step-by-step Instructable, but you'll still need to get your hands dirty with Arduino and some circuitry. The whole project is open source, and while it's a step up from Lego, until we can just print these things, it seems like a great option to us.

Mimbo the iPhone robot will smile for you, still doesn't get your 'Seinfeld' references
This here is Mimbo. He's the kindly sort. Smile and Mimbo smiles back. Sure, others in his place might let their cardboard bodies, iPhone faces and all of the male bimbo jokes stand in the way of having a good time. Not Mimbo. The happy little 'bot uses facial recognition to generation a corresponding emotion on that cardboard-wrapped iPhone head of his. His face is composed of four LEDs for eyes, an empty label eyelid and a mouth made from a multifader, all created using TouchOSC. And using facial tracking via a program like FaceOSC, little Mimbo can mimic your expressions. Check out the 'bot in a video after the break and find out how to manufacture your own Mimbo at home in the source link below.

USB Biofeedback Game Controller lets you play Mario with your guns (video)
Those gun-show tickets you've been offering out to everyone (that nobody ever takes) can suddenly do a lot more, thanks to Advancer Technologies. It's developed an Arduino-based plug-and-play bio-feedback game controller that uses EMG (electromyography) sensors to monitor the electrical activity in your skeletal muscles and turn them into game controls. For example, a bicep twinge represents jump, a gripped fist means run forwards -- as long as you've sufficient definition for those two to be distinctive. Check out the must-see muscle action after the break, or see how it's done at the source link. [Image courtesy of Dreamworks]

A DIY Arduino watch that's actually wearable, still won't win you points with the ladies
Here's a little fashion secret: it's all about the details. Wear cheap square-toe shoes with that $5,000 custom-made suit and people will notice. The same is true of a watch. Your timepiece can say a lot about you, including: "I'm a big nerd, please beat me up and take my lunch money." So, what does an Arduino watch tell your peers? Well, for one, that you have way too much time on your hands. And two, that you're crafty person capable of putting your brain meats to work building actual things. Of course, telling time with a series of brightly glowing LEDs on an exposed PCB also sends the message that being fashionable is not your primary concern. If you're looking to earn some geek cred, and can live with the fact that wearing this will probably cost you that cute girl's number at the bar, hit up the source for instructions. At least this wearable Arduino timepiece is a slightly less conspicuous than the Steampunk version we saw last summer. One more pic after the break.

Autodesk adds DIY site Instructables to its stable
Autodesk has really decided to embrace the DIY community recently. First the company launched 123D, a free design tool for hobbyists, now it's snatched up Instructables, an online repository for everything from quadrocopter plans to bruschetta recipes. There's no need for amateur inventors out there to worry about the acquisition, though -- it doesn't sound like much will be changing at the site. Makers will still own the copyright to their creations and the brand will be keeping its focus on user submitted projects, but the site's blog does promise that improvements are on the way thanks to the deeper pockets of its new owner. Most of the finer details of the purchase are still unclear, but there's some more info in the PR after the break.

Web-controlled tweeting Roomba is a perfect storm of DIY magic
There are three things that will guarantee your DIY project some attention: slap it on a Roomba, base it on Arduino, or make it tweet. Do all three and, well, you've got a nerdgasm-inducing bit of Make fodder. The creation you see above is a web-controlled tweeting Roomba whipped up by Instructables member matchlighter using a 500 series vacuum bot and the Sparkfun WiFly shield for Arduino. The autonomous cleaner can be triggered from anywhere there's an internet connection and updates Twitter to keep you abreast of its status (Ahh! Dock sweet dock). While Mr. matchlighter was kind enough provide directions for building your own, a lot of the actual coding is left up to you. (We're lazy, let us just copy and paste dammit!) If you think you've got the programming chops, hit up the source link for instructions and check out the original's Twitter feed at the more coverage link. Update: The complete code is in step eight of the Instructable.

Laser tripwire does Hollywood-style security on the cheap, precious jewels not included
Sure, you could opt for a laser tripwire that puts intruders on blast via Twitter, but there's something to be said for the simplicity of the latest security system to come from Instructables user EngineeringShock. You've seen this setup before: a group of mirrors are strategically positioned to bounce a laser beam across an open space, ensuring that even the most nimble of invaders -- excepting MacGyver, perhaps -- will set sirens blaring. Consisting of a programmable keypad, a laser and detector, a series of six carefully aligned mirrors, and an LED-equipped siren, the system does Hollywood-style security on a budget -- the siren being the most expensive element at $20. If you're looking to lock your stuff down like they do in the movies, follow the source link for full instructions, or check out the video demo after the break.

Protect your slingshots with an authentic Zelda treasure chest (with sound!)
Are you looking for a quick-and-easy storage solution for the adventure-ready knick-knacks you've got laying around the house? Oh, sure, you could probably just tuck that slingshot, Deku stick and empty bottle into any old Rubbermaid tub, but if you're looking for a more authentic way to put things into other things you need a real-life Legend of Zelda treasure chest, complete with brief musical interlude. (You know the one.) You can follow the instructions posted on Instructables to make your own Hylian lockbox, and check out the video after the jump to see (and hear!) it in action. Just be sure that you make everything to scale -- if you make the chest too large, you're going to have to put something way more awesome in it.

Super Pong Table serves up four-way retro play, whole lot of awesome (video)
Sure it's just sliding sticks and bouncing balls, but anyone who grew up playing Atari can tell you that Pong rules. Unfortunately, its earliest incarnation only supported enough 2D fun for two, which is why our eyes just about popped out of our heads when we saw this. The folks over at Instructables are showing off another awesome retro gaming project that makes everyone's favorite game a party pleaser -- it's also a pretty good fix for an old coffee table. The Super Pong Table allows for up to four players and fives balls per game, and enlists 900 LEDs and four Atari paddle controllers to make the thing work. Each player controls his or her own stick and gains or loses a point depending on whether they hit or miss a ball -- the first player to reach 20 points gets their very own "YOU WIN" light up display. Looks like we just found something to do with our weekend. You can check out a video of the table in action after the break or follow the source link for instructions on making your own.

DIY business card displays your info via persistence of vision, fails to impress Patrick Bateman (video)
Still fancy the age-old business card and enjoy outrageous DIY projects that may or may not make you look foolish? Continue on then, dear reader. The peeps over at Instructables have provided a lengthy and seemingly difficult set of directions on how to craft a persistence of vision business card. POV allows your eyes to see text or images generated by light waving back and forth -- in other words, your name is displayed by swinging your arm in a giant circle. If you're cool with this, hit the source link, build your own and be sure to let us know how many contacts you make.

VCR head gets Frankenstiened into a beefy momentum scroll wheel
We've seen a fair share of VCR hacking in our day, but this momentum scroll wheel built from an old VCR head by Instructables community member Osgeld sets a new bar for jerry-rigging dead technology. Apparently the project arose from a desire to find a 21st century-approved use for the circular part that was gathering dust after being stripped from a spare Sony VHS player. The result is a bulky, yet useful, scroll wheel that can easily be set into motion and sustained via its own inertia to keep spinning for long periods. That feature could prove useful to anyone saddled with a mountain of video editing work, or even you lazy folk just hoping to flick less while reading the web. Unfortunately, a quick glance at Osgeld's DIY tool and part lists indicate you'll need to do quite a bit more than ransack a tape player to get this job done right. But then, when do the good things in life ever come easy?

DIY Kinect TV stand uses $10 worth of materials
If PDP's official Kinect TV mount is a bit too pricey for you, Instructables user Riffraff67 has designed a sort of shelf for the Kinect that uses about $10 worth of materials and about 15 minutes' worth of labor. It might look, well, insane, consisting of a metal plate (in the example, a "handicap" sign), a bit of PVC pipe, and Velcro, but it appears to fulfill its function of putting a flat surface on the top of your TV. Besides, nobody'd be able to tell you had instituted such an unorthodox solution unless they peeked behind the TV, and then they'd probably just be impressed by the combination of thrift and cleverness it suggests.


