Windows 11's new AI features: How to use Paint, Clipchamp, Snipping Tool and Photos
Not all of Windows 11's new AI features are related to the Copilot AI assistant; artificial intelligence is built into many native Windows apps as well.
Microsoft is injecting a ton of generative AI-powered features into Windows 11, but it's not all about the Copilot assistant. The company has started to update a string of apps with new AI functions, including Paint, Clipchamp, Snipping Tool and Photos. Microsoft released an update for Windows 11 2023, known as 23H2, on October 31. That update expanded access to Copilot and other AI features.
Microsoft is rolling out the AI updates gradually, so you may not have access to everything just yet. Still, it may be handy for you to know what you can do with the new tools. Here are some pointers on how to use the AI features in each app.
How to use Paint in Windows 11
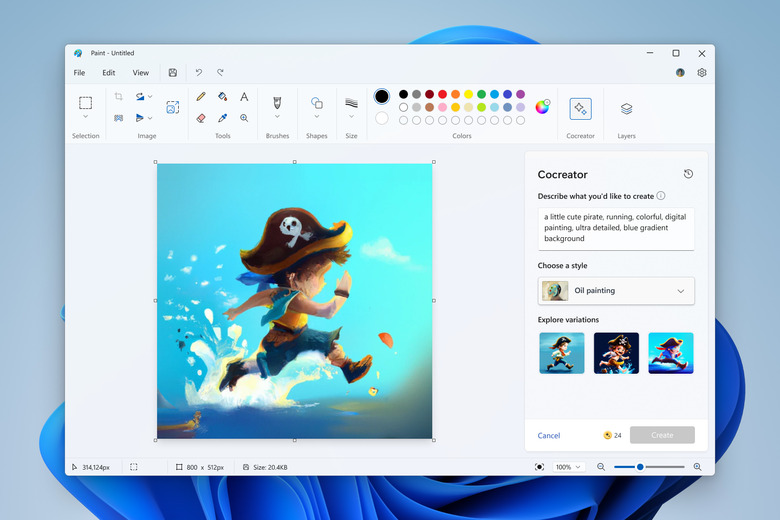
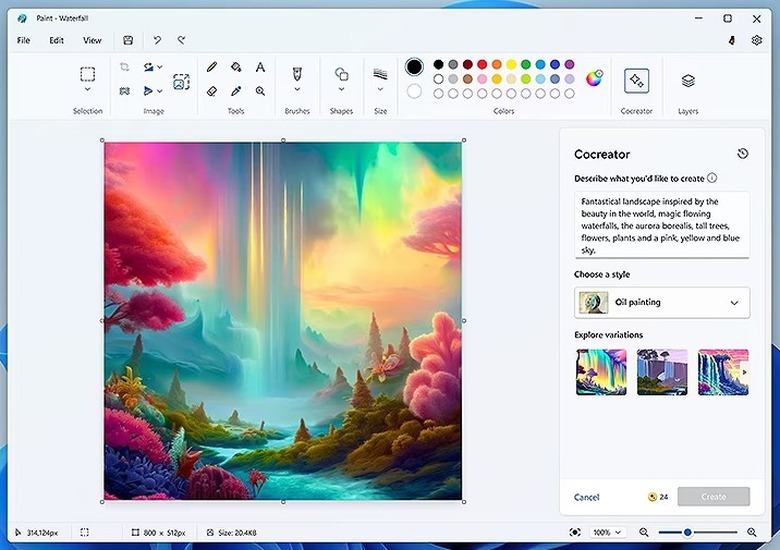
An AI-infused version of Paint that includes generative AI features is rolling out to Windows 11 users. Microsoft Paint Cocreator taps into the DALL-E model to enable you to create images based on a text description. The feature will whip up just about anything you can think of (within reason).
It's easy enough to get started with Cocreator, as long as you have access to it. To begin with, Cocreator is available in the US, UK, France, Australia, Canada, Italy and Germany. Only prompts in English are supported for now. At the outset, there's a waitlist to use Cocreator. You can join this from the Cocreator side panel and you'll receive an email to let you know when you can start using the feature.
You'll need to sign into your Microsoft account to use Cocreator. That's because the cloud-based service Cocreator runs on requires authentication and authorization. You also need to sign in to access credits; you'll need these to generate images with DALL-E. When you join Cocreator, you'll receive 50 credits with which you can create images. Each generated image costs one credit.
How to install Paint on Microsoft Windows 11
If you don't already have Paint installed, you can download it from the Microsoft Store. Once you have it, open Paint and select the Cocreator icon on the toolbar. From there, you can type in a description of the image you'd like the AI to generate. Microsoft suggests being as descriptive as possible in order to get results that match your concept.
After entering the text, select a style that you'd like your image to be in. Then hit the Create button.
Cocreator will then generate three different images based on your text input and the style you chose. Simply click on one of these images to add it to the Paint canvas so you can start modifying it.
Meanwhile, Paint now supports background removal as well as layers. With the help of AI, you can isolate an item (such as an object or person) and remove the background with a single click. You can also edit individual layers without affecting the rest of the image.
How to use video auto composition with Clipchamp on Windows 11
It should be easier for you to stitch footage together in the video-editing tool Clipchamp. The app will help guide you with automated suggestions for the likes of scenes, edits and narratives. But it's the auto compose feature that may prove most useful for many users. Auto compose is available on the web and in the Microsoft Clipchamp desktop app.
Microsoft says that the media you add to Clipchamp is not used to train AI models and all of the processing takes place in the app or browser. The app's AI video editor (which Microsoft says is useful for everyone) can automatically generate slideshows, montage videos and short videos in 1080p based on the photos and videos you add to it.
If you don't like the first video that Clipchamp offers up, you can check out a different version "instantly" since the app will generate multiple videos for you. Auto compose may also prove useful for professional video editors, Microsoft says, as the tool can generate several unique videos in the space of a few minutes.
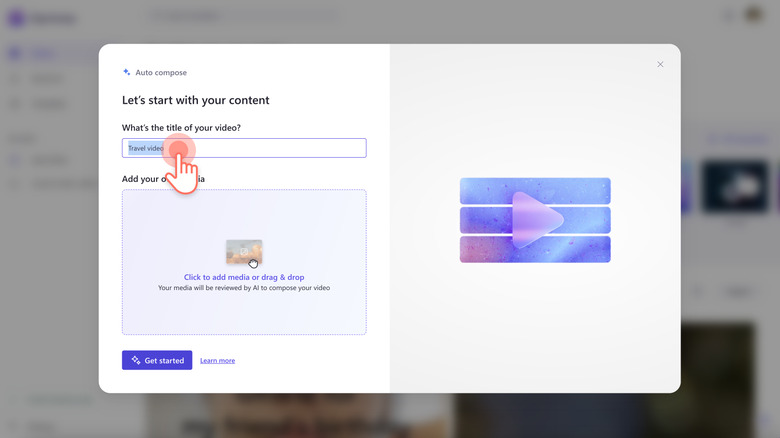
After you sign into Clipchamp, click the "Create a video with AI" button. You'll find this front and center on the main page. After you give your project a working title, you can upload media by clicking the "Click to add or drag and drop" button. Alternatively, you can simply drag and drop videos and photos into the media window.
Once you've finished adding everything, hit the "Get started" button. Now, it's a case of letting the AI know what kind of style and aesthetic you're looking for. Styles include things like elegant, vibrant and bold. You'll use thumbs up and thumbs down buttons to inform the AI of your preferences. Alternatively, you can leave the decision up to Clipchamp by selecting the "Choose for me" option. When you're ready to move onto the following step, click the Next button.

Clipchamp will suggest a length for your video based on what it believes are the best combinations of your media. You'll be able to adjust the video length and the aspect ratio before moving on. Before you leave this screen, you can preview the video by clicking the play button.
Next up, you'll be able to change the background music on the "Finish your video" screen if you're not a fan of the track that the AI picked. Click the music button to change the tune. Again, you'll be able to preview your video and audio track. If you're not happy with the video, you can ask for a different take by clicking on "Create a new version."
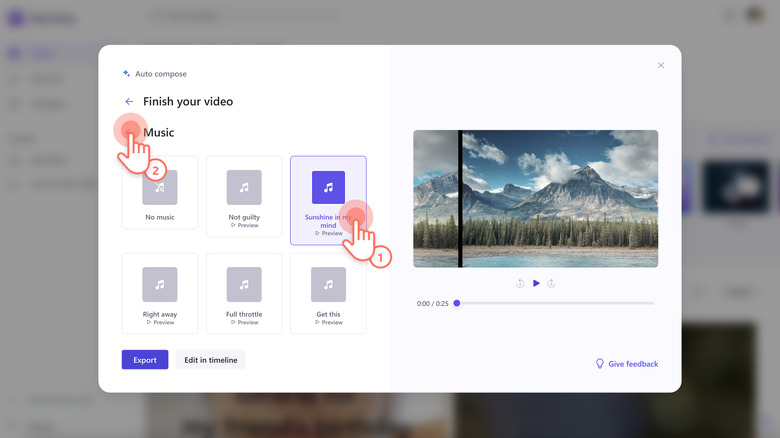
If you do like the video Clipchamp has created, you're pretty much done at this point. Click the Export button to save the video. From the export page, you can share your video directly to the likes of YouTube and TikTok, or add a copy to your OneDrive storage.
After the AI is done with your video, you can further customize it in Clipchamp. Click on the "Edit in timeline" button and you'll be able to do things like add stickers, captions, animated text and audio files.
In addition, you can enhance your video with AI options including a text-to-speech voiceover feature and automatically generated subtitles. The speaker coach tool aims to provide you with real-time feedback on your camera recordings to help improve your speaking skills and video presentations.
Many Clipchamp features are available for free. But for videos in 4K resolution and other premium tools, you'll need to pay for the essentials plan, which costs $12 per month or $120 per year.
How to use Snipping Tool's AI features
The Snipping Tool is one of the most useful in Windows 11. It's a cinch to capture and share some or all of your display. The app's AI functions should come in useful in a number of ways.
First, the app supports text recognition. If you use the Snipping Tool to take a screenshot of something with text in it, you can click the Text Actions button. At the outset, you'll have two main options. You can copy all of the text and paste it into another app.
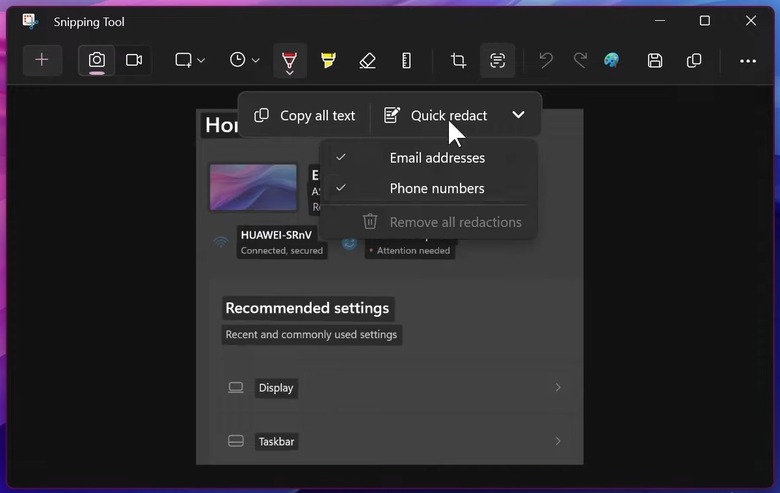
Alternatively, you can quickly redact private information. The tool should be able to recognize email addresses and phone numbers, and you'll be able to swiftly blue those out. That should save you having to manually cover up text in, say, Paint.
The Snipping Tool should work quite nicely with Copilot as well. As indicated in a Windows 11 promo video, you can paste something you've clipped with the tool into Copilot, then do things like ask the assistant to remove the background from the image.
How to use Background Blur in Windows 11's Photos app
The Windows 11 Photos app has some useful AI features as well. Those include improved search for images stored on OneDrive accounts —- it should be easier for you to find a photo based on content or location where it was taken.
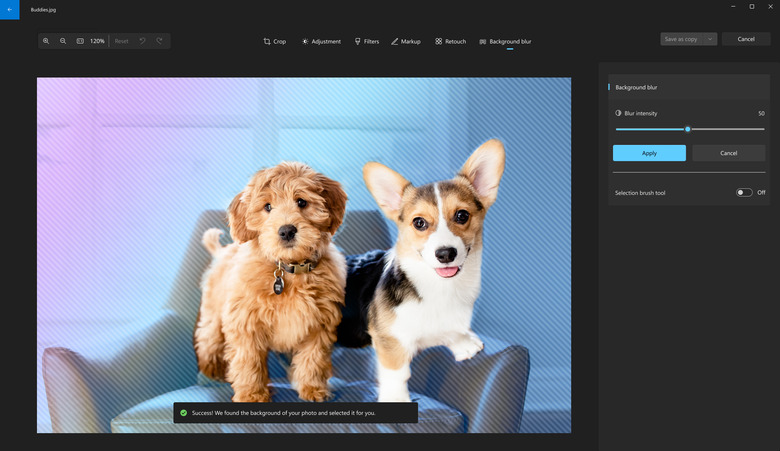
The app's editing features have been enhanced thanks to AI as well. One of the handier and easiest-to-use tools is the self-explanatory Background Blur (Paint 3D has a similar feature). That can help the subject of your photo stand out. AI separates the background from the subject, but to ensure your data stays on your device, the separation process takes place there rather than in the cloud.
To use Background Blur, first select the image you want to use and open it in the Photos app. Click on "Edit image" at the top of the screen and select Background Blur. You'll then have a few options to choose from. You can opt to enable the blur effect instantly; adjust the intensity of the blur before applying it; or have more granular control by turning on the "Selection brush tool."
Opt for the Selection brush tool and you can manually add denote more parts of the image for the AI to blur out. Alternatively, you can deselect parts of the image that you don't want to be blurred. You'll be able to change the brush size for finer control and modify the brush softness to intensify or turn down the blue effect.