These Shortcuts can help you clean out your iPhone or iPad
Want to get started with Apple's Shortcuts? Here's a handy crash course.
We may receive a commission on purchases made from links.
"Spring cleaning" usually conjures up images of tedious housework, but it's worth thinking about tidying up your smartphone and tablet, too — and I don't mean physically, though that might also be a good idea. If you're anything like us, your devices are full of old photos, files and apps taking up valuable storage space. Now is as good a time as any to start cleaning things out. And if you're an iPhone or an iPad user, Apple's Shortcuts feature just might be able to help.
What are Shortcuts?
In a nutshell, Shortcuts let you quickly perform a specific task, or a more complex sequence of tasks, with a single tap or voice command. This idea isn't unique to Apple — if you're a geek of a certain age, you probably know these as strings of actions better as "macros."
Building your first Shortcut can seem daunting at first, but relax: You don't need to be a coder to create a truly useful setup. All it really takes is a little time to put all the pieces together. More than anything, I've come to think of these things as little logic puzzles. You know the result you're looking for — it's just a matter of thinking through the steps and finding the right sequence of actions to get you there.
There are, of course, limits to what Apple will let you do. Let's say you're like me, and you're just awful at remembering to clear out your notifications regularly. I would love to create a Shortcut that would automatically dismiss notifications generated more than a day or two ago, but Apple doesn't make information about a notification's age available to Shortcuts. Similarly, there doesn't appear to be a way — for now, at least — to figure out the last time you used certain apps, so there's no way to build a Shortcut that highlights apps you could delete without missing them. As you'll see later, Apple also has a fairly limited set of tools for interacting with files stored directly on your iOS device.
Granted, there are a handful of third-party apps, like Toolbox Pro, Data Jar and JellyCuts, that dramatically expand on the Shortcut tools that ship in iOS, but the thing to remember is that there are some tasks you can't pull off with Shortcuts yet.
Oh, and for the sake of your sanity, it's best to start piecing together Shortcuts on as big a screen as possible. Since there's no Shortcuts functionality available on Apple's Macs — even the new ones running the iPhone-inspired M1 chipset — that means use an iPad if you have one. Don't worry: As long as your iPad and iPhone are signed into the same Apple ID, any Shortcut you create on one will be visible in the other.
How to create a Shortcut
Piecing together complex actions to help clean out our devices involves a lot of trial and error at first, so let's work through a basic example. Meet BackupNotes: It's the first half-decent Shortcut I ever made, and as the name implies, it's meant to help you quickly save your old notes in the cloud before you go through and start cleaning house.
The logic here is pretty straightforward. First, we check today's date and dial it back 30 days to make sure nothing relatively new and necessary gets caught in the net. And right off the bat, you have a few different ways to pull this off. At first, I actually created a separate shortcut called "MonthAgo" that takes the current date and subtracts 30 days from it. From there, I could add an instruction to the BackNotes workflow to run the MonthAgo shortcut first, then pass that adjusted date into the Find Notes action. Turns out, that whole rigmarole wasn't actually necessary. After a little Googling, I could just define the date and adjust it directly inside this shortcut. This new approach is a whole lot cleaner, but I'm still grateful I took the long way around first since it opened my eyes to the possibility of linking multiple shortcuts together.
It's pretty much smooth sailing from there. Searching for actions related to the Notes app in the Shortcuts sidebar reveals a handful of options, including just the one we need to select notes older than the date we defined earlier. Then, just add an action for compressing those notes into a single ZIP file — you can't see it in the image above, but there's also a text field to give the new compressed file a name — and cap things off with a save action.
I should note that while those last few steps sound like the easiest, they took a little more time to figure out than I care to admit. Originally, I had wanted my iOS devices to open the share sheet so you could more easily get that new ZIP file to contacts, or into the cloud storage app of your choice. You can do that, but there's a caveat. If you use a Shortcut to give a file a name and try to send it via the share sheet, the name doesn't actually stick; it winds up with whatever generic name Gmail or Telegram or Google Drive decides to give it.
Naturally, the Shortcuts apps' flexibility means there's a fairly easy workaround, if you're game. It just takes a couple extra steps right at the end. You could, for instance, close things out with an action to send that same file via the share sheet, plus one more to delete it after you've moved it where you want it. It's functional when run, but it requires one final tap to confirm you want to delete the ZIP file, which feels a little inelegant. Thankfully, the solution I landed on does just fine for my purposes. By saving the notes backup through iCloud Drive, you can manually choose a third-party storage service (Google Drive, in my case) that you've already connected to the iOS Files app.
Tweaking the formula
Now that your notes are all safely stored elsewhere, you can now scrub through them all and delete as needed. But what could we do if we put a twist on that basic formula? Well, how about this: Let's back up other files you've stored on your iOS device before you go on a cleaning spree.
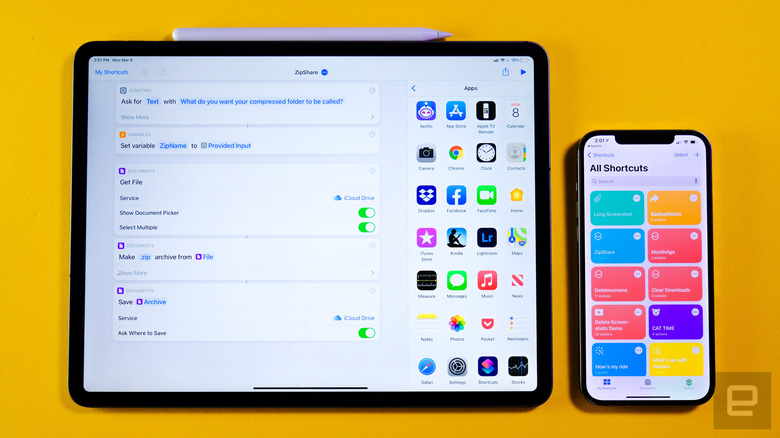
As you can see, the last two steps here are the same as in the previous example, but the lead-in is a little different. Because I want to be able to choose the backup's file name rather than just tag it with the date as we did before, things start with an "Ask for text" action. The user then punches in whatever file name they want, which gets saved as a variable in the following step. (Pro tip: Once you find actions you suspect you'll use frequently, you can save them as favorites for easy access.)
With the beginning and the end sorted, it's all a matter of getting to the files we need. That's easier than it sounds. Rather than use the "Find Notes" action from last time, "Get File" is what we need to dig into your iOS device's file structure. Once that action is in place, it's important to make sure the options for showing the document picker and selecting multiple files are ticked. That way, once you actually run the Shortcut, you'll be able to navigate through the folders on your device and pick the ones you'd like to package up and offload in the final two actions. Once again, you can store that new compressed file in almost any cloud storage service that's connected to your Files app. (I say "almost" because Dropbox can be added to your Files app, but you can't navigate to it when it's time to save the file. If your life lives in Dropbox, you have to use a different, similarly straightforward action to store your backup in there.)
As useful as this Shortcut can be, Apple's limitations mean it's not as automated as one might prefer. There's no way that I know of to use the "Get File" action to collect all files in a specific folder, like the one all your Safari file downloads get saved to. Being able to automatically select those files, bundle them up and save them somewhere would be really helpful, but the app just doesn't offer that kind of granularity.
Adding more actions
I don't know about you, but the screenshots album on my phone is a disaster — it's all fleetingly funny tweets, images of my homescreen I captured by accident and a screen grab of this beautiful nightmare. If your iOS device is starting to run low on storage, clearing up every little bit can help, so let's take a stab at a Shortcut that automatically deletes some of those old images.
Right off the bat, there are two new actions to dig into. The first does exactly what it says on the tin — feed it a snippet of text and the Shortcut will read it aloud. (This obviously isn't necessary, but what's life if you can't goof around a little?) The second, meanwhile, is one you'll probably find yourself returning to pretty frequently. It gives you the ability to define and display multiple options in a notification that slides down from the top of the screen. In this case, we want to be able to delete screenshots we consider old, or delete all screenshots in one fell swoop. It also introduces us to the idea of carrying out multiple tasks in a single Shortcut. This will definitely come in handy as you continue to build your own.
Granted, these are pretty simple tasks — one of them does the now very familiar date adjustment trick, and uses the Find Photos action to select all of the screenshots created more than a month ago. (You can tweak this pretty easily if you'd rather, say, select screenshots that were last modified before a specific date.) Once that action applies those criteria to find the right images, it's just a matter of adding a Delete Photos action to get rid of them. By default, you're prompted to confirm you want to erase those files, so there's always a chance to back out if you think better of it.
As for the next task, deleting all screenshots instead of a selection of them? That's easy: Just recreate the previous task, but without specifying how old the screenshots should be. As with the other examples we've worked through, there's plenty of room for experimentation and customization depending on exactly how you'd like things to work, but for now, we have a dead-simple tool for clearing out some of your old, unneeded files
What next?
So, we've created a few helpful Shortcuts — now what? Well, you should probably try them out. All the Shortcuts you make are accessible from inside the app, but there are situations where you might need quicker access to them. For those cases, you can put the appropriate Shortcuts right on your home screen, and as usual, there are a few ways to do this.
The simplest way to go is by adding a Shortcut widget. On an iPhone, long-press an app icon and tap the plus sign that appears in the top-left corner. From there, you can pick out exactly the widget layout that feels right, and plop it in the middle of all your apps. If that looks a little too big for your liking, you can also create app icons on your home screen that directly execute your Shortcut of choice:

Alternatively, you could always just use Siri — it can recognize all of your Shortcuts by name, and executes them (almost) the same way as if you had just poked at your screen. The only real difference is that if any of your Shortcuts require text input, like the file name prompts we built above, you'll have to respond out loud rather than punch text in manually.
This is just a crash course for Shortcut creation. If you're interested in learning more about crafting these clever utilities, there's no shortage of places to turn — I've mostly relied on the excellent r/Shortcuts subreddit and Chris Lawley's YouTube channel to get a sense of what was and wasn't possible early on. But, the best way to figure out how to make better Shortcuts is by pulling some apart.
Pop into your iOS device's settings and allow "untrusted" shortcuts. This allows you to install shortcuts created by other people, and looking at how their logic unfolds can be extremely informative. Just make sure you take a few moments to look at how those third-party shortcuts actually work before you run them!