Blood Pact: Destruction 101 at 90 in the end of Mists

Every week, WoW Insider brings you Blood Pact for affliction, demonology, and destruction warlocks. This week, Megan O'Neill mentions in a quick announcer voice that green fire spells are sold separately.
So, you just boosted to 90 on your warlock and...now what? This whole pet deal is bananas to you and maybe you've heard that destruction (often abbreviated as "destro") — is a simple spec, so you figure you'll try that one out first. but where do you start? And how can you learn without embarrassing yourself?
Let's start, shall we?
Setting things up
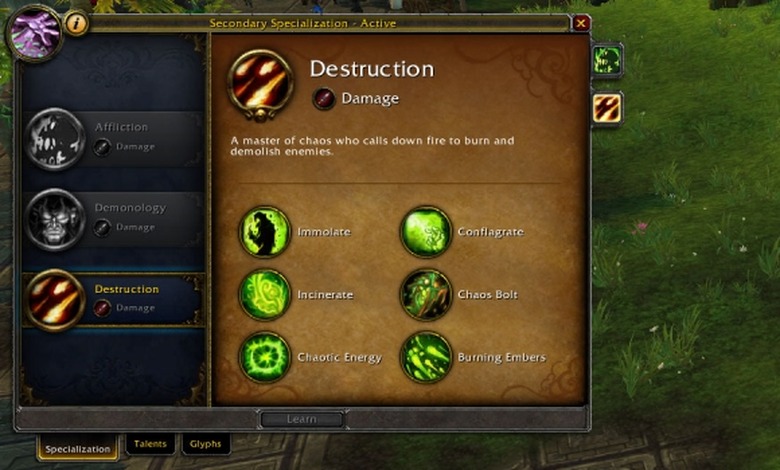
I don't understand how this pet thing works. That's OK, because as destruction, we're going to start off with the level 75 talent Grimoire of Sacrifice (GoSac), which leaves you petless in the end. Although in soloing ventures you might want to use Grimoire of Supremacy (GoSup) with the voidlord out, we're going pure petless to get used to it.
GoSac is good for destro mainly because Chaos Bolt is specifically potent under GoSac plus a good trinket proc. The boosts to other signature spells and the passive health regeneration are just bonuses.
Once you've chosen GoSac, summon a pet to sacrifice. Here's what you get from each:
- Imp: A defensive dispel
- Voidwalker: A health-increasing survival CD
- Felhunter: An interrupt
- Succubus: A small AoE-knockback
- Felguard (demonology-only): A charge
I'd suggest a voidwalker sacrifice if you're too squishy for your likes, but I'm going to go with the felhunter's interrupt as it's occasionally useful. Once you've summoned your pet, drag Grimoire of Sacrifice to a bar and click it to sacrifice your pet. Command Demon adapts to your sacrificed spell or to a specific pet ability (the tooltip tells you what ability) when you have a pet out. Pull Command Demon out of your spellbook and put it somewhere.
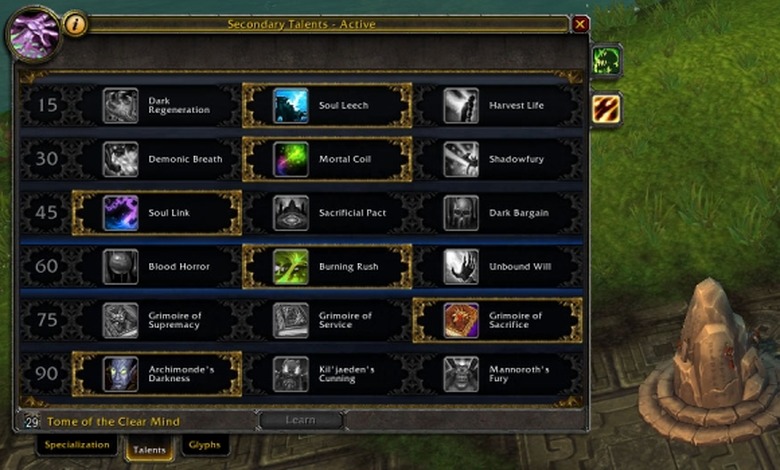
While we're on the talent pane, what other talents should I pick? Depending on what you're doing, different talents will be better. For now, this article is going to focus on a solo, questing or daily-like activity out in the world, so we're going with my default setup. While you look at the tooltips, let me explain some choices.
- Soul Leech — This talent passively affects your filler, your big nuke, and your execute, all of which you use regularly as destro.
- Mortal Coil — While Shadowfury gives you a small AoE stun, I like to use Mortal Coil as a back-up mini-healthstone.
- Soul Link — When combined with GoSac, this boosts your maximum health by 20%, which makes for better survival as a newbie.
- Burning Rush — I like to be speedy.
- Grimoire of Sacrifice — We already talked about this.
- Archimonde's Darkness — This affects the main DPS CD and it's the talent we'll choose for many group activities at 90 anyway.
You can use Kil'jaeden's Cunning — the casting while moving talent — instead of Archimonde's Darkness if you need more practice, but in order to better train situational awareness and different casting techniques, I'd recommend leaving yourself without the easymode casting while moving.
Glyphs? I almost never change from using Siphon Life, Conflagrate, and Healthstone. Sometimes you can use Ember Tap instead of Conflagrate. Minors are up to you, though Nightmares is my favorite.
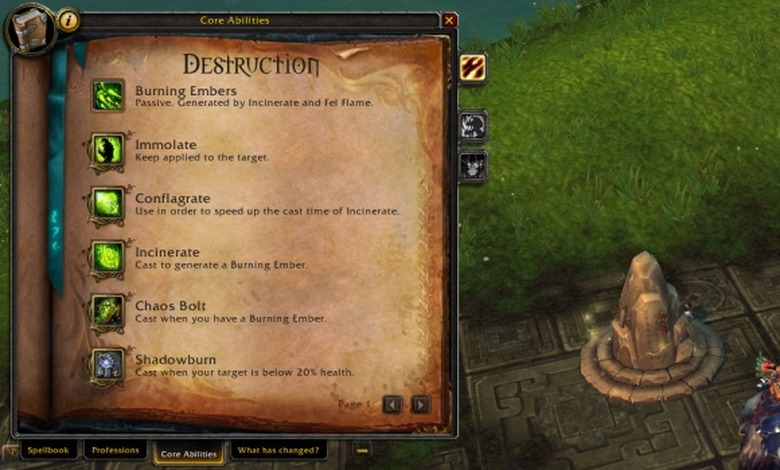
What the fel are burning embers? Burning embers are the secondary resource for destruction. Destro locks generate and spend embers in order to deal damage. On the default unit frame, you see them as four little bars that fill up and drain down. With other addons you can see what we warlocks sometimes like to call "emberbits;" 10 emberbits make 1 burning ember.
What spells do I use? I've written before on how I arranged my keybinds, so you can borrow some of the setup from there if you wish. Destro is probably the least button-intensive of the warlock specs. I'll include popular abbreviations in parentheses.
Destro has spells to generate burning embers (double embers on crits)...
- Incinerate (Incin) — Your filler spell and your main ember generator.
- Conflagrate (Conflag or CF) — Through a passive, this makes your Incinerate or Chaos Bolt cast shorter and Incinerate cost less mana
- Immolate (Immol) — Destro's main DoT and it generates embers on ticks.
- Rain of Fire (RoF) — Destro's AoE spell that generates embers on tick-hits. Being destro means this is an instant cast rather than a channeled spell, and you can place it multiple times at once.
- Fel Flame (FF) — An instant nuke, often used for moving.
...and destro has spells to spend or consume burning embers (1 ember per spell use).
- Chaos Bolt (CB) — Your big nuke above 20% target health.
- Shadowburn (SB or SBurn) — Your big nuke below 20% target health. It also generates 2 full embers if you kill a target while the debuff is on.
- Fire and Brimstone (FnB) — Turns your Incinerate, Conflagrate, and Immolate spells into AoE versions of themselves. Abbreviations are usually "FnB: Spell" as in the spell you'd use with FnB.
- Ember Tap (ET or simply Tap) — This is destro's version of Life Tap; it's a heal.
- Flames of Xoroth — It's supposed to revive your last minion, but if you die, it resets "your last minion" to the imp.
Other essential abilities you'll use:
- Curse of the Elements (CoE)/of Enfeeblement (CoEnf or the old CoW) — I recommend having a macro to combine these two curses together.
- Havoc — This duplicates 1-3 spells to another target.
- Dark Soul (DS) — The main DPS CD.
- Unending Resolve (UR)/Twilight Ward (TW) — Mitigation CD/Shadow damage absorb
- (Mortal Coil) Level 30 Crowd control talent macro
- (Burning Rush) Level 60 movement talent macro
- Summon Demon button (it's a fly-out menu)
- Dark Intent (DI) — Our party buff of spellpower and stamina
- Healthstones (HS) once conjured — optional
Priority rotation
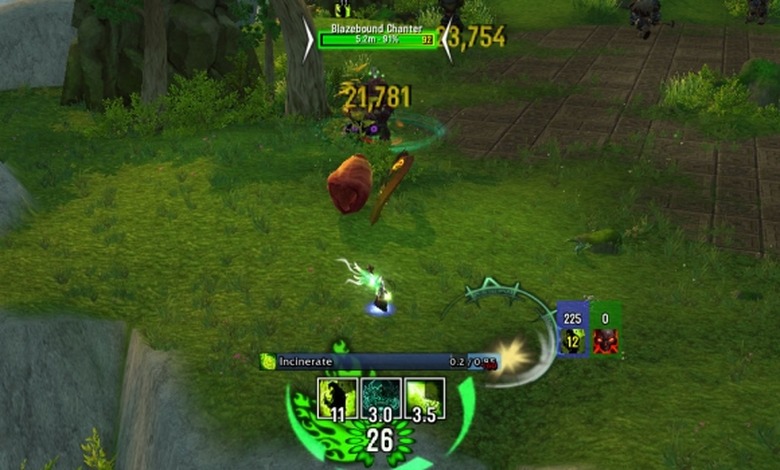
You'll start cold with 10 emberbits (1 full ember), so first learn the opener:
- Set up your target with debuffs (CoE) and DoTs (Immolate).
- Hit a Conflagrate and then start building embers with Incinerates.
- Hit Conflagrate again when you run out of Backdraft charges or when it comes off cooldown.
- Refresh Immolate as needed.
- Use Rain of Fire to generate embers if many mobs or if you get a nice haste proc (e.g. Heroism).
- Use Fel Flame if you have to move.
Once you've gained 35 or more emberbits (3.5+ full embers), cast Chaos Bolt. The idea of working toward 3.5 embers is so you store enough embers to dump 2-3 Chaos Bolts during a major proc (intellect, spellpower, mastery, or crit) without capping out at 4 embers. If a proc happens when you're below 3.5 embers, go ahead and spend a Chaos Bolt or two before build up embers again.
Rinse and repeat the Conflagrate-Incinerate rhythm with Chaos Bolts, generating and spending embers. When the target reaches 20% health, your Shadowburn button will light up and become available to press; use this where you previously used Chaos Bolt.
If you want a pretty visual reminder of how your spells are interacting with each other, you can use my Weak Auras.
What about AoE? AoE for destruction is fun and a little more interactive than the other two specs. You can use it as a passive ember generation tool rather than a straight multiple-target damage tool. I touch on it in a post about different types of AoE, but we'll have to revisit this topic later to get the most out of destruction AoE. For now, Rain of Fire or FnB: Incinerate are the simplest.
Timeless Isle: Spell play in action
Now that we've got buttons for you to press and talents to support you, let's go kill some mobs. A cool place to not waste your time practicing in is the Timeless Isle.
With the three bonus items on the Timeless Isle to boost my damage and survivability and the Chi-Ji buff in my Isle gearset, I'm still a little too OP for my tastes. If only I had the bagspace for keeping all those quest greens.
Although I regularly farm Ordos's terrace as destruction, I'm going to do a level at a time per post. Although the spec specifics will remain independent, the practice portion will build on each post; so don't worry, if I missed something, it's probably in the next post! The upper yaungol levels are easier done with a voidlord out, and this post uses GoSac as an example.
Lessons to learn from the lower woodland or animal mobs are mainly movement-oriented. Each creature can usually only use the ability once or twice before you kill it, so it's a nice introduction to temporary movement.
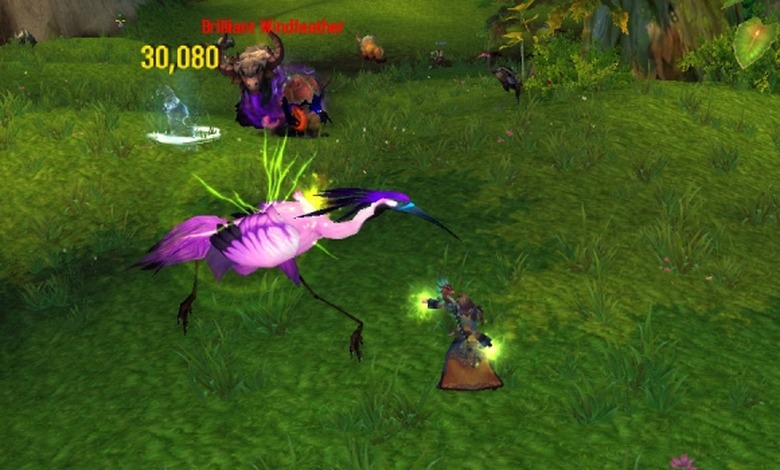
- Cranes and crabs — Conal cast that will take out half your health if you let it. Sidestep it or run through the mob to the other side.
- Turtles — Spins while dealing damage and a snapping bit. Kiting or pet practice.
- Yaks — Area charge that stuns if you get hit. Stand on the edge of the charge rumble circle to (usually) avoid the stun.
- Tigers — A leaping stun and a conal effect with a damage DoT if it hits you. To avoid the charge, move as they actually leap; they'll follow you if you move while they prepare to leap.
A couple of the animal types are harder for the quest-green newbie, but can be taken down with either a pet or better gear.
- Snakes — Continuously casts the big bite. Kill it before it kills you.
- Frogs — Each attack stacks a DoT that will 1-shot at 10 stacks. Best done with the voidlord and pulled leisurely.
- Jademist Dancer elementals — Nasty blast cast; you can interrupt one with the felhunter or observer interrupt, but you'll have to kill it before it gets another cast off.
- Foreboding Flame in Cavern of Lost Spirits — Like Jademist Dancers, these have a nasty blasting cast. You'll need the ward buff from the blue campfires to survive. Kill it before it kills you & get out of any big flame circles.
Blood Pact is a weekly column detailing DOTs, demons and all the dastardly deeds done by warlocks. We'll teach you how to get green fire and what a warlock is really all about, but if you're just looking for a loot list or a 101 guide at 90, we've got those, too.