Weekend Geek Project: Create your own image hosting system
For the past several years I have been trying to come up with a good way to post images to the web from my iPhone. Now that I have a Mac as my web server via MacMiniColo, it is incredibly easy.
Now, I'll be completely honest, setting this up did take some time and effort. It is not as simple as clicking a button, but if you can follow some instructions, you can do it too, assuming that you have access to all of the pieces.
The Goal
This shouldn't be a difficult problem to solve:
-
I have an image on my iPhone.
-
I want to post it to the web and get an URL that I can use.
I have tried all of the various image sharing services out there. They all have the same problems: either they are chock full of ads and don't want to give you just a plain URL to use, or they go out of business. Or, sometimes, both. The latest one to go under is mlkshk, which is a shame not only because they provided a great service, but when I checked the various "Terms of Service" at different image hosting companies, they had the best one.
But even if there was a great service out there with a great app, I'm still not sure that it would be better than the "holy grail" solution that I have wanted:
- Take a picture on my iPhone using the regular camera app (or any other).
- Edit it (or not) using the regular photos app (or any other app).
- Email the picture, which gives me a chance to reduce the size (or not).
- Receive an URL to the direct image via push notification.
Since I couldn't find the service that I wanted, I've tried rolling my own a few times, but none of them worked as fast or as easily as I wanted, until I figured out the last missing piece.
The Pieces of the Puzzle
I won't hold you in suspense: the last missing piece was a real Mac server. I recently signed up for MacMiniColo and I couldn't be happier with the decision unless I could get in a time machine to go back and make it sooner. Once I had a Mac server, the rest of the pieces were easy:
-
SendToDropbox – gives you a private email address that you can use to email files and have them added to your Dropbox. Although paid accounts are available, you can start using it for free.
-
A shell script (naturally) which will move the file from the SendToDropbox folder to the appropriate web folder, and do some other housekeeping.
-
Pushover (or Prowl) – to send push notifications from your Mac to your iPhone.
SendToDropbox
Once you have created a SendToDropbox account and linked it to your Dropbox, you'll need to go to https://sendtodropbox.com/account and create a special email address just for this purpose. It will generate a random email address for you. Keep it random. That way no one else will be able to post pictures to your website via email! (For added security, see the "Whitelist" settings in SendToDropbox.)
Once you have your SuperSekret SendToDropbox email address, go to the "Organization" tab, and drag the "To Address" and "Subject" from under "Available Attributes" to "Destination" so that it ends up as shown above. Make sure that the "To Address" comes before the "Subject."
What this means is that every file that you send to your SuperSekret@sendtodropbox.com email address will be saved to ~/Dropbox/Apps/Attachments/SuperSekret@sendtodropbox.com/Your Subject Here/.
I'll explain why that's important in a moment.
launchd
There is a feature in launchd called QueueDirectories which looks at a directory. It has to end up being empty, but that's OK because we are going to empty all of the files when we're done.
Replace /Users/jsmith/Dropbox/Apps/Attachments/SuperSekret@sendtodropbox.com with whatever the SendToDropbox path is on your Mac:
Now what about that /usr/local/bin/sendtodropbox-image.sh file? Well, that's the last piece of the puzzle.
sendtodropbox-image.sh
The script sendtodropbox-image.sh is going to process the files in your SendToDropbox folder ~/Dropbox/Apps/Attachments/SuperSekret@sendtodropbox.com by moving them into the folder that you use the host images, and then it's going to send you the URLs via Pushover using a shell script called posh that I have previously discussed over at GitHub.
It also uses jhead to make sure that the iPhone pictures appear with the correct rotation. If you do not have it installed already, I recommend brew install jhead (or you can get it from rudix ).
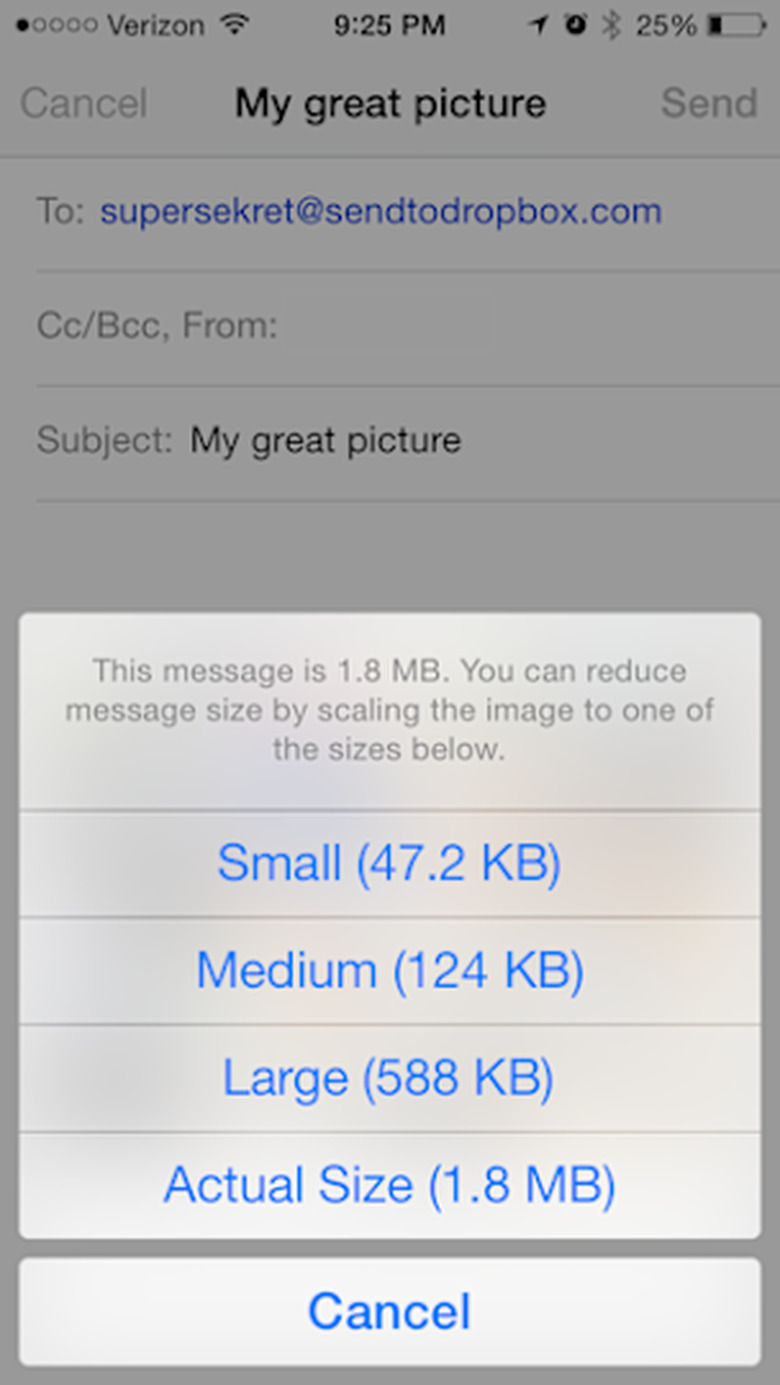
Now when I want to post an email, I just send an email, choose the size:
and then about a minute later I'll get a confirmation with the URL
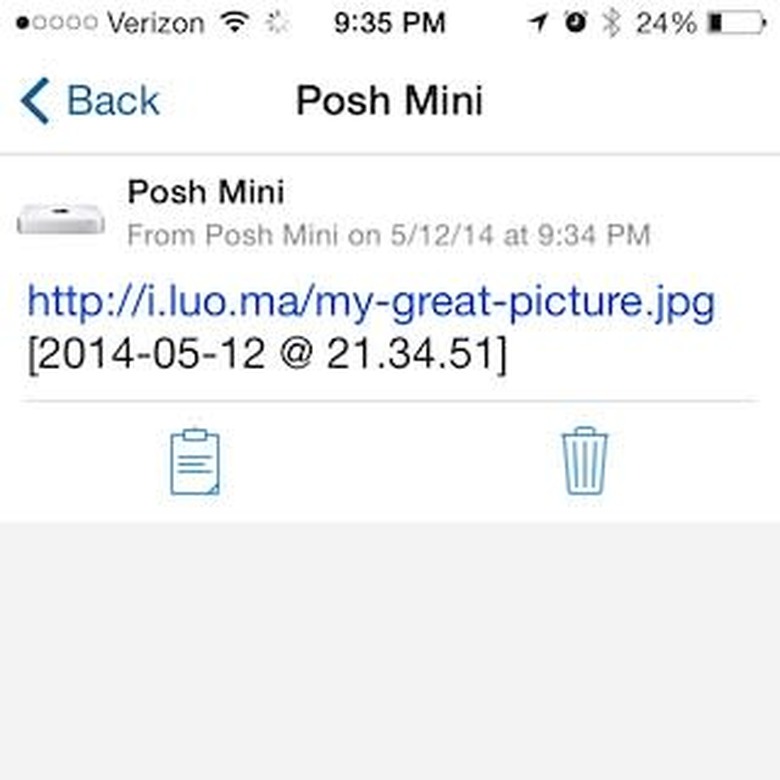
And then I can use that image anywhere. Like right here, for example:

You do not need a Mac server to do this if you have an "always on" Mac, you could do this and then sync it to any web server using unison or rsync. However, you'll have to figure out those steps on your own. Now that I've experienced what it's like to have a real Mac server, I can't imagine going back to anything else.
If any of you scoffing at the idea that a Mac mini could be a "real" server: I am using a 2010 Mac mini (Macmini4,1) Intel Core 2 Duo with 2.66 GHz process with 4 GB of RAM and a non-SSD hard drive. Most of us would look at those specs and say that it is not "new" and not "powerful" but it rocks as a server. I've been running lots of apps on it at once, including Time Machine, Dropbox, OwnCloud, and BitTorrent Sync (I'm testing sync options for another article), as well as hosting my own websites on it, and it hasn't even blinked.
Summary Recap
Here's a checklist for you if you want to re-create this on your own Mac:
- Create a SendToDropbox account
- Setup an email address to be used for this purpose and configure its "Destination" as shown above (e.g. ~/Dropbox/Attachments/Foo/)
- Add the email address to your iPhone contacts
- Create a
launchdplist file in your ~/Library/LaunchAgents/ folder named something likecom.tjluoma.sendtodropbox.email-to-url.plist- Set the
QueueDirectoriesto the directory used by your SendToDropbox address created in step 1 ( ~/Dropbox/Attachments/Foo/) - If you do not plan to put the shell script at
/usr/local/bin/sendtodropbox-image.shbe sure to change the contents of theplistto point to wherever you will save the script. - Load it using this command (substituting whatever name you chose):
launchctl load ~/Library/LaunchAgents/com.tjluoma.sendtodropbox.email-to-url.plist
- Set the
- Create the
sendtodropbox-image.shscript, ideally at/usr/local/bin/- Change the
SOURCE=line to point to the folder described in Step 1 (that is ~/Dropbox/Attachments/Foo/ or whatever you chose) - Change the
DIR=to the folder to your web server's path - Make sure it is executable:
chmod 755 /usr/local/bin/sendtodropbox-image.sh
- Change the
- Setup Pushover
- Create a new account at https://pushover.net/login
- Generate a Token and User key at https://pushover.net/apps/build
- Get po.sh, configure it, make it executable
- Install jhead
That's all. The setup will take you some time, but once you have it, you can use it with the knowledge that you never have to worry about a 3rd-party image hosting company going out of business, or changing their terms of service, or anything else they might do.