

The safest and easiest way to debloat Windows 11
You can clean up a lot of Windows' pre-installed junk, but should do so methodically.
It's no secret that Windows has seen better days. Since Windows 11 arrived in October 2021, the operating system has garnered a reputation for bloat, with Microsoft publicly admitting in February 2026 that Windows 11 needs some improvements. Its attempts have been a mixed bag — some changes have improved performance, added options to the system UI and rolled back obnoxious adware, but plenty of issues remain unaddressed.
While some people can abscond to Linux, many require Windows for work or to run a particular app. For those people, the optimal solution is to spend some time debloating Windows 11, which means clearing out the unwanted software and settings Microsoft and its corporate partners bundle into Windows 11.
In its default state, Windows 11 is loaded with user tracking and data collection pipelines, adware and pre-installed third-party apps whose developers have a deal with either Microsoft or the hardware vendor to be there uninvited. While only the junk apps are properly bloatware, all these nuisances are colloquially lumped under the umbrella of "bloat," since they're unnecessary.
So how do you get rid of Windows 11 bloat and do so without accidentally breaking your computer? No debloating process is entirely without risk, but the safest and easiest method is a combination of manual uninstallation and settings modification, combined with the surgical application of a custom debloating tool.
Step 1: Remove obvious bloatware

The first step in slimming down Windows 11 is to remove the bloatware, adware and other junk that comes pre-loaded on a new install. Depending on your hardware vendor, your computer may come with games, anti-malware trials or other types of software you didn't ask for. Microsoft also loads the operating system with lots of its own apps, many of which can safely be uninstalled if you don't want to use them. For example, if you don't play video games, you can get rid of the Xbox app.
It's difficult to break Windows beyond repair by wantonly uninstalling apps, as Microsoft generally prevents crucial parts of the OS from being easily uninstalled. However, you can go overboard. For example, the various Windows Runtime programs are necessary for running software. If you're unfamiliar with which apps tend to be useful, start by only removing the most obvious bloatware, such as casual games and third-party security tools.
To uninstall bloatware, open the Settings app with the keyboard shortcut Win + I, then select Apps > Installed apps. For each unwanted app, click the three-dot button to the right of its name and select Uninstall. In some cases, you need to confirm the choice by clicking a Windows system confirmation, while in others you'll need to click through a full uninstall process provided by the app you're uninstalling.
Step 2: Choose a debloating tool
With the most obvious bloatware gone, the next step in safely trimming the Windows 11 fat is disabling Microsoft's prolific telemetry, tracking and advertising. We'll be using a comprehensive debloating tool, which will change many of these settings without you needing to mess around in the Settings app. I recommend returning to Settings later and going through each menu, if only to ensure that everything is to your liking after you've run the debloater.
There are a number of "one-click" debloating tools available for Windows 11, but I generally caution against them. While they will aggressively streamline Windows by ripping out its most annoying and invasive components, they're taking a sledgehammer to a problem that is best solved with a scalpel. It's worth spending a bit more time doing a more granular debloat to configure Windows for your specific needs without causing headaches.
My go-to debloating tool is Chris Titus Tech's WinUtil. Unlike other solutions, WinUtil is nothing more than a script with a GUI, and it can be accessed right from the command line. To run it, right-click the Start button and choose Terminal (Admin), then type the following command followed by Enter:
irm "https://christitus.com/win" | iex
You should never run commands you find on the Internet, especially those that fetch data from the web, without being certain what they do. This one comes from a trusted developer and is safe; feel free to click around the site if you want to learn more first.
While WinUtil is a user-friendly tool, you can still cause issues if you run its advanced tweaks without understanding them. Proceed with some caution from this point. It's wise to create a restore point before beginning so you can return to a stable state if needed. Type "restore" into the Start meu, choose Create a restore point and choose Create to make a new one. Use the System Restore button on this same menu if something breaks.
Step 3: Carefully use a trusted debloating utility
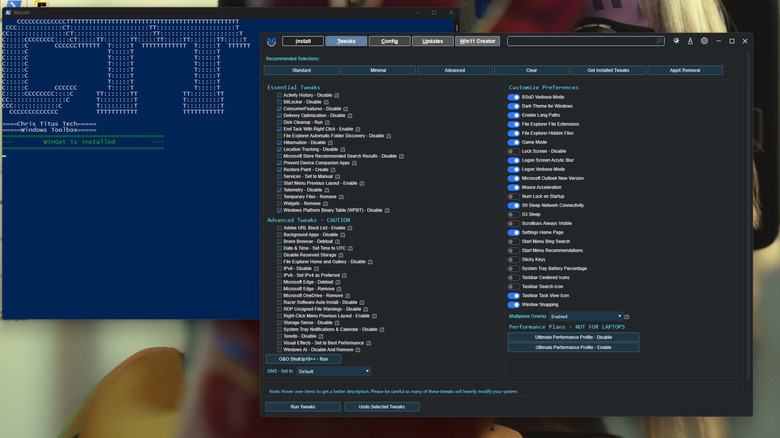
Once you run the script, it will take a few seconds to execute, then a window with a graphical interface for WinUtil will surface. After a recent redesign, WinUtil is now divided into five tabs, but most people only need to worry about the ones labeled Install, Tweaks and Updates.
You'll want to start with Tweaks, which Titus has helpfully broken up into two categories: Essential Tweaks for basic debloating and Advanced Tweaks, which you should not mess around with unless you're confident you know what you're doing. Hovering over any tweak will show a short description of what it does. Click the question marks for more detailed documentation, including the exact commands each one will execute on your machine.
A number of recommended selections, like Standard and Minimal, appear across the top of the Tweaks tab. Each will select a different assortment of tweaks to implement, based on how aggressive you want to debloat. You can either select one of these default profiles and then click the Run Tweaks button at the bottom-left of the window, or you can choose your own tweaks. If you select one of the default options, the safest choices are Minimal and Standard; the more aggressive options can remove core components of Windows that most people need.
You can mix and match tweaks, skipping any that would conflict with how you use your PC. While some of the Advanced Tweaks may be helpful in certain cases, going overboard can get dicey. The most likely change you'd want to make in that section is the Microsoft OneDrive – Remove script. Unless you use OneDrive, it becomes a major annoyance on Windows 11.
Step 4: Change apps and settings to customize your Windows experience
On the right side of the Tweaks tab, you'll see a list of toggles labeled Customize Preferences. These mostly enable quality-of-life features that Windows doesn't give you by default. For example, BSoD Verbose Mode will give you more information about what happened if your PC crashes with a "black screen of death" error, and Enable Long Paths allows Windows Explorer to handle file and folder paths longer than the system default of 260 characters. You don't need to do anything to finalize those choices; each preference is updated when you adjust its respective toggle.
Lastly on this page, you'll see a custom performance plan designed for desktop PCs. Essentially, this unshackles your PC from all power limitations, ensuring that it will never turn anything off to save power or downclock the CPU while idle. You should only enable this if your PC is well-cooled and you can afford to spend a bit more on electricity each month. If you're running a high-end gaming rig or using your PC as a remote media server, you may find some benefit here. Otherwise, it's best not to enable it — it would hurt a laptop's battery life.
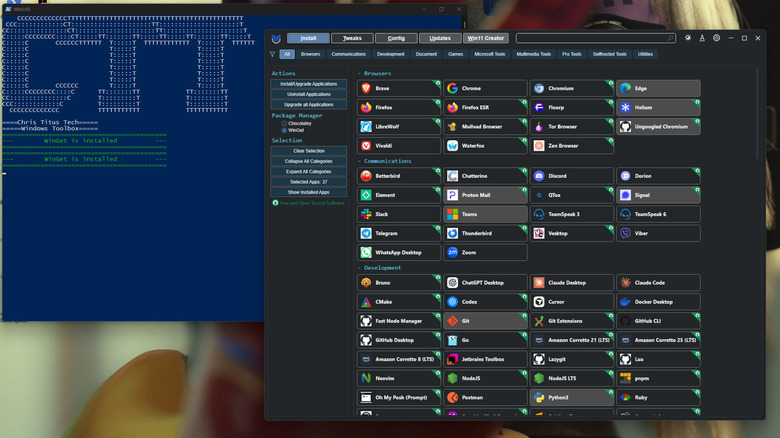
Next, head over to the Install tab, where you'll find a host of programs to install, or quickly uninstall if you already have them. While some of these apps are fantastic, our main goal is to remove crap from Windows, not add it. To do that, click the Show Installed Apps button on the left side of the window, then wait a few moments until those programs are highlighted. Deselect any programs you want to keep, so that only programs you consider junk (for instance, Microsoft Teams) remain highlighted. Then, click the Uninstall Applications button on the left side of the window and kick back for a few minutes while the tool works.
At this point, you've gone as far as you can to debloat your system without causing any potential negative effects towards system stability and usability. You've removed as much of Microsoft's ability to track you and serve ads as you can, as well as the bloatware needlessly taking up space on your storage drive. Your Windows computer should feel a bit more streamlined and unobtrusive, like it belongs to you rather than to Microsoft.