How to take a screenshot on a Windows PC
Microsoft has a number of built-in tools to save your screen.
We may receive a commission on purchases made from links.
Whether you just splurged on a new Surface device or you're still working with a trusted, older machine, learning the basics like taking a screenshot will be quick and easy. There are several ways to take a screenshot on your PC. The most versatile though is probably Microsoft's Snipping Tool, which lets you save your entire screen or a free-form screenshot. Here's how to take a screenshot on a PC, including instructions for Windows 11 machines and older, Windows 7 devices, too.
How to take a screenshot of the entire screen
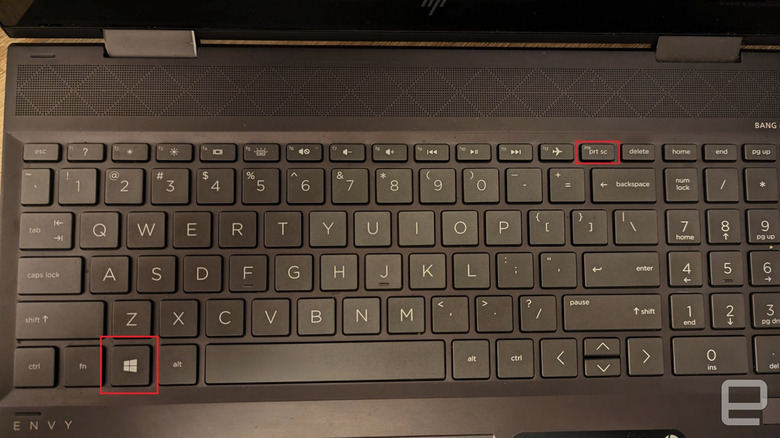
There are two different ways to screenshot on Windows. The first option is the Print Screen button: to capture your entire screen, press the Windows key and the PrtScn key simultaneously. If your PC doesn't have the PrtSc button, instead press Fn + Windows key + Spacebar. To locate the image, open File Explorer, and go to the Pictures folder and then the Screenshots subfolder.
For any device with the most recent versions of Windows 11, pressing the Print Screen key will open the Snipping Tool, which you can read more about below.
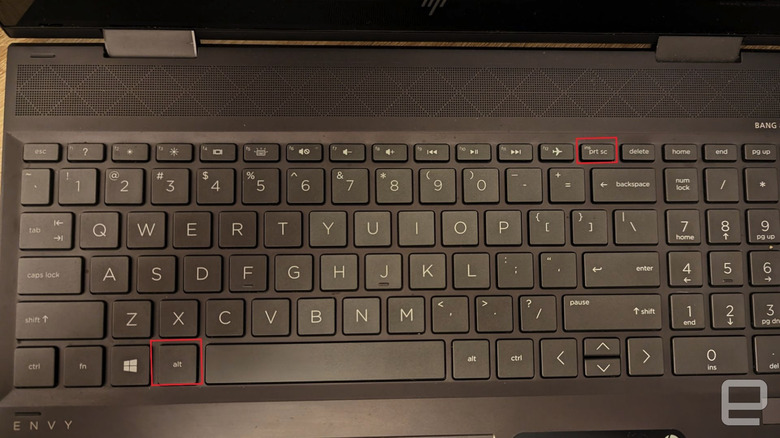
How to take a screenshot of an active window
If you only want to save an image of the window you're currently in, press the Alt and PrtScn keys together. This will put the image into your clipboard. While your PC will save screenshots into a designated folder, partial screenshots like these will go to your clipboard. You will need to move them from your clipboard to an image editor like Photoshop, Windows' default Photos app or even a document editor like Microsoft Office to save it in the file format of your choice.
How to use the Snipping Tool
You can use Windows' Snipping Tool to customize your screenshot further. For any Windows 10 or 11 machine, press either Windows key + Shift + S together or the PrtScn key to open the Snipping Tool. For those using Windows 8.1 or 7, you will need to search for the app in your Start menu. Both options will give you a toolbar where you can customize your "snip."
From here, you can take free-form or rectangular images of your screen. Any screenshots captured by the Snipping Tool will be sent to your clipboard. From the clipboard, so you can save the image to the Screenshots folder, as well as rename the file and change the file format. You can also annotate your screenshots using the pen or highlighter icons.
There are several keyboard shortcuts for the Snipping Tool that will help you customize your screenshot experience:
-
Ctrl and +: Save the Snip
-
Ctrl + C: Copy the Snip
-
Alt + M: Select a Snipping Mode
-
Alt + D: Set a timer to your screenshot by 1-5 seconds
-
Alt + M: Create another snip but with the same mode. For example, if you took a rectangular snip, you could make another one quickly using this method.
-
Shift + arrows: Move between different types of snips
Bonus for Microsoft Surface users
If you have a Microsoft Surface device in tablet mode, press the Power button and the Volume Up button at the same time to take a screenshot. If you have an attached keyboard, you can take the steps listed above, too. Similar to a desktop, the screenshot can be found by going to the Pictures folder and then Screenshots.