Spaces
Latest
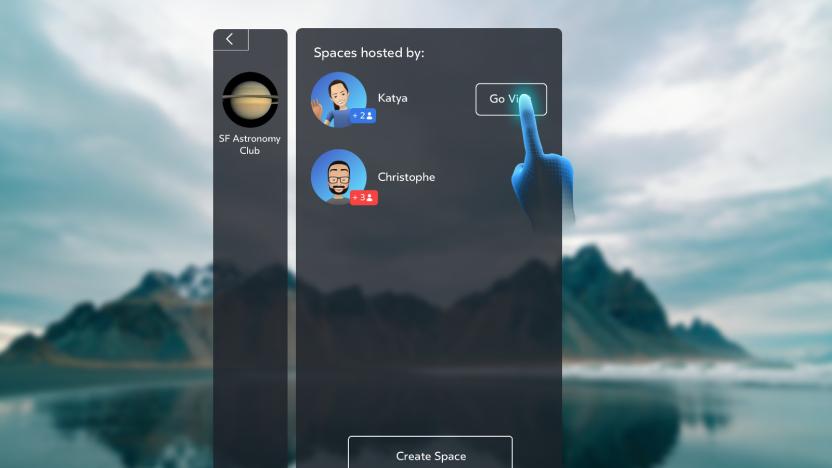
Facebook opens up social VR app Spaces to Groups
Facebook Spaces is no longer just a place for you to hang out with friends and family in your list: you can also use it to form bonds with people in the Groups you're in. You can now host or join a VR Space with up to four people from a Group, so you can discuss shared interests in virtual reality. The social VR app allows you to connect with new people in a deeper way: you could, for instance, conduct practice sessions together using VR props if you're all part of a music or a stand-up comedy group. You could perform in one Space as a band and livestream your performance to friends. You could also watch videos together or just chat and get to know one another at a deeper level in a VR environment.

Facebook brings its social VR 'Spaces' to the HTC Vive
Earlier this year, Facebook unveiled Spaces, its inaugural attempt at bringing the social network to VR. And, seeing as Facebook also owns Oculus, it's no surprise that Spaces was a Rift-exclusive at launch. But, just as Facebook is on every platform and device imaginable, the plan for Spaces was always to have it spread far and wide as well. That's why starting today, Facebook is making Spaces available for the HTC Vive, marking the first time the app is going cross-platform.

'Bait!' brings an ice fishing expedition to Facebook's social VR
Facebook launched its social VR Spaces beta last April, finally showing us a compelling experience that helped put the social media company's acquisition of Oculus in the first place. Recently, Oculus showed off a little ice fishing game from casual game studio Resolution Games at the Oculus Connect 4 conference. Now, the game -- dubbed Bait! Arctic Open -- is ready to take you and a friend into Spaces VR together.
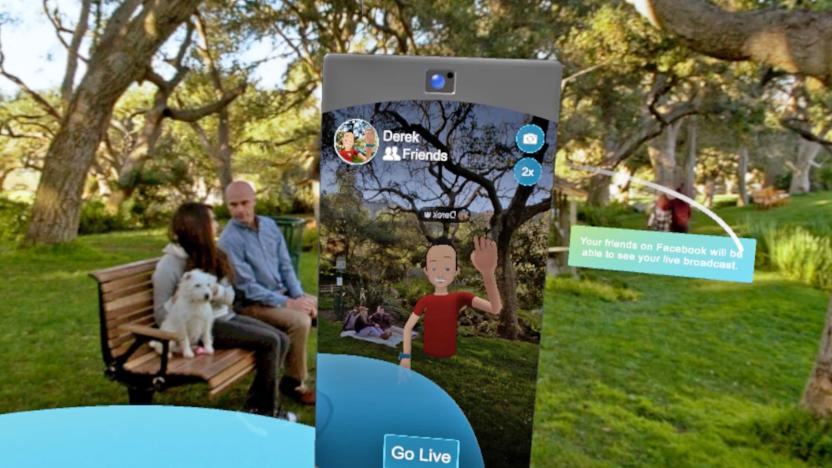
You can broadcast live from within Facebook's social VR app
Earlier this year, Facebook launched Spaces, a social VR experience that lets you and your friends interact with each other in virtual reality. Now, the company is ready to introduce a new aspect of Spaces by merging it with another Facebook product: Facebook Live. That's right; starting today, anyone with an Oculus Rift can livestream directly from Facebook Spaces, letting anyone and everyone have a peek inside your VR universe.

I don't want to live inside Facebook's vision for social VR
Over the last few decades, there have been several attempts to merge the mundane aspects of the real world with the digital. All of these, while catering to a niche, have failed to conquer the world in the way that Mark Zuckerberg hopes that Facebook's social-VR efforts will.

Watch Facebook's F8 keynote in under 10 minutes
If there was still any question why Facebook paid all of that money for Oculus, today's F8 keynote provided some extra explanation. From AR to social VR and more, the company laid out its plan for the immediate future that involves blending the virtual world with real life. If you missed the hour-long talk earlier today, don't fret: We've compiled all the big news in a 10-minute clip. Click here to catch up on the latest news from F8 2017!

Google is shutting down Spaces
Google's oh-so-brief Spaces experiment didn't even last a year before the company decided to shut it down. According to a note from the Spaces team today, they've made a "tough decision" and the group-sharing social network will lock down in read-only mode on March 3rd, then completely shut down on April 17th.

Matterport makes over 250,000 of its digital tours VR ready
Thanks to companies like Oculus, HTC and Google, 360-degree experiences are becoming a lot more mainstream. Having been on the 3D bandwagon for a number of years, Matterport is now taking the time to open up its vast collection of tours to all. To coincide with the launch of CoreVR, a platform that makes it easy to turn its Street View-like shots into virtual reality experiences, Matterport has made its new technology available in 250,000 Spaces, potentially letting you tour a Star Trek movie set, traditional Maori village or the first ever Boeing 737 with only your smartphone and a VR headset.

Google buys a startup to improve Spaces
It's no secret that Google Spaces in its current incarnation is... undercooked. The group-oriented app missing features you might expect from an internet giant, and those features that are there don't always behave like you'd expect. Google is in it for the long haul, though. It just bought Kifi, a startup that focuses on internet-based collaboration and sharing. The Kifi team isn't shy about what it'll be doing -- it's joining the Spaces team to improve its underlying features. While you'll probably have to wait some time to see what that entails, it's clear that Spaces isn't going to wither from neglect.

Spaces proves Google still doesn't get social
Yesterday Google launched Spaces to help small groups work together with shared images, links, videos and, of course, text. It's tough not to compare the service to Pinterest or Facebook Groups (it even has stickers that post as soon as you tap).

Google Spaces helps you share things with small groups
Apparently, Google+ refocusing on communities just wasn't enough. Google has introduced Spaces, an app for Android, iOS and the web that's designed solely for sharing experiences in small groups. All you have to do is start a topic, invite a few people (no, they don't need Google+) and you're off to the races -- there's a conversational view that makes sure you see whatever's going on. Chrome, search and YouTube are built-in, so you don't have to hop between apps to find a relevant story or video.

Mac 101: Additional tips for OS X Lion's Mission Control
TUAW's Dave Caolo did an in-depth look at OS X Lion's new window/application manager, Mission Control, the day of OS X Lion's launch. If you're completely confused about Mission Control's features, Dave's post is a good place to get a baseline of knowledge on this new feature. In this post, I'll be covering two additional features of Mission Control that will help alleviate some of the confusion associated with it, especially if you're used to the way Spaces worked in earlier versions of Mac OS X. Tip 1: Assigning applications to a specific Desktop Mac OS X Snow Leopard had a preference pane in System Preferences that allowed you to assign applications to a particular Space. Unfortunately, Mission Control's preference pane in OS X Lion has no such feature, which has led to a lot of confusion amongst users who were comfortable with Snow Leopard's method of assigning apps to Spaces. It turns out this feature hasn't vanished altogether in OS X Lion, but it has been moved to a somewhat less "discoverable" location. It's also less configurable than the preference pane setup Spaces had in Snow Leopard, but that may actually be of benefit to novice users. First, use Mission Control to navigate to the Desktop you want your application to be assigned to. Once there, right click the Dock icon for the application you want to assign -- if the application isn't one you normally keep in the Dock, you'll need to launch the app first. After right clicking the app's icon, you'll see a contextual menu pop up. On this menu, under Options, you'll see a submenu called "Assign To" with three different options: All Desktops, This Desktop, or None. "All Desktops" is just that; the app will follow you around no matter which Desktop you're using. "This Desktop" will "pin" the app and its windows to your current Desktop, both now and for all future launches of the application. You can still move windows between Desktops manually if you desire, but by default they'll open in the assigned Desktop. The third option, "None," is the default; applications aren't assigned to any particular Desktop, will simply launch in whichever one you're currently using, and will stay there when you navigate to a different Desktop. Assigning applications to a particular Desktop can help a lot in keeping things organized. I'll offer my own setup as an example: Desktop 1: Safari, Echofon, Mail, iChat -- My main Desktop gets all my communication tools assigned together. Desktop 2: Aperture, Photoshop -- All my photo editing apps in one spot. Desktop 3: Pages, Keynote, Numbers -- I have this desktop set aside for "Productivity" apps. Desktop 4: iMovie, Handbrake -- This Desktop is devoted to video editing/transcoding apps. All Desktops: Finder -- Obviously I don't want to move to a different Desktop every time I need to dive into the file system. This may not be true for all users migrating from Snow Leopard, but my Spaces preferences from Snow Leopard carried over to Lion, so I didn't have to re-assign any applications after upgrading. Tip 2: Assign a different wallpaper to each Desktop A feature I always wanted to see in Snow Leopard's Spaces was the ability to assign different background pictures to each Space in order to make them visually distinctive. Without that, it was sometimes difficult to tell which Space I was in. This feature has found its way into OS X Lion, and it's quite simple to set up, especially if you already know how to change your desktop background (easy to find in System Preferences under "Desktop & Screen Saver"). To simplify things, first assign System Preferences to "All Desktops" using the tip above -- this will save you some headaches if you're changing multiple Desktop backgrounds at once. Then, navigate to the Desktop whose background you want to change. Once there, change the background in System Preferences. Simple. Using different backgrounds for each of your Desktops will make navigating between them in Mission Control much easier -- especially since Apple hasn't yet implemented any way to rename Desktops. Hopefully these two tips will help you get more out of Mission Control than you would otherwise. The feature is above all meant to help you organize things and make them easier to navigate, but it does take some tweaking to get Mission Control to realize its full potential.

Mac OS X Lion and Mission Control
Lion's Mission Control represents the evolution of three technologies introduced with earlier versions of Mac OS X: Spaces, Exposé and Dashboard. With Mac OS X Lion, Apple has merged the three into a single interface, called Mission Control. It offers an at-a-glance overview of the applications and documents you've got open as well as distinct virtual workspaces (which I'll call "desktops"). With Mission Control, you can keep applications separated while maintaining a bird's-eye view of what's going on. Here's what you need to know about Mission Control in Mac OS X Lion. Opening Mission Control You must open Mission Control to use it, of course, and Lion offers several methods. For many, the easiest will be a multi-touch gesture. However, those without a multi-touch surface, like a trackpad (either built-in to a laptop or Apple's Magic Trackpad accessory) still have several options, as keyboard shortcut support is extensive. First, let's look at the supported gestures. %Gallery-128706% Those with a trackpad have a few options. The default gesture is to swipe "up," (bottom-to-top) with three fingers. Alternatively, you can opt to use four fingers for this gesture. You'll find the preference settings by opening System Settings, clicking on Trackpad and then clicking the "More Gestures" tab. Those with a Magic Mouse can open Mission Control by double-tapping on the mouse's surface. Note that there are no other options for opening Mission Control via gesture on a Magic Mouse. It's double-tap or nothing. If you don't have a multi-touch surface, you've still got plenty of options. For example, you can: Drag the Mission Control app into the Dock and launch with a click Assign it to a hot corner (which I'll explain later in this post) Press the Dashboard key on your Apple keyboard That's really just the beginning. Later in this post, I'll describe the Mission Control preference pane, which really opens up the launch options. For now, I'll describe how Mission Control looks and behaves. How Mission Control Looks As I mentioned before, Mission Control combines Dashboard, Spaces and Exposé into a single interface. For now we'll leave Dashboard and discuss Spaces and Exposé. Together, they make up the bulk of Mission Control, in both form and function. Here's a look at each. Along the top of the main Mission Control interface you'll find a horizontal listing of the thumbnail images of your various desktops. This is, of course, the the current iteration of Spaces. By default, there are two desktops available: the Dashboard and the current desktop. Each is labeled ("Dashboard" and "Desktop 1"). As you've probably guessed, subsequent desktops are labeled sequentially ("Desktop 2," etc.). Below the desktop thumbnails you'll find the Exposé area. It depicts the applications and documents currently open. Documents and windows are sorted into piles, according to their parent application and each is labeled with the appropriate icon. For example, a "pile" of Word documents will bear a Word icon (bottom center), while Pages files will show the Pages icon. I'll discuss working in the Exposé area later in the post. For now, let's look at the desktops. How it Works - Spaces and Desktops As I said, you start with two desktops by default: the Dashboard on the left and the current desktop on the right. Each desktop thumbnail shows the frontmost application in the space. When using desktops in Mission Control, you'll typically do five things: Add new desktops Navigate between desktops Move applications between desktops Jump to a given desktop Close unwanted desktops Here's now to do each. Adding New Desktops The are two ways to do this. The first is to move your cursor to the upper right-hand corner of the Mission Control interface. As you do, a new desktop will partially appear with a "+" on its edge. To create it, just give it a click. It slides into place and receives the appropriate label. The other method lets you create a new space and add an application to it in one fell swoop. Here's how. Click on an application window in the Exposé area. Drag it to the upper right-hand corner. The "new desktop" appears. Drop the window onto it. That's it! A new desktop will be created, containing all open files relating pertaining to the application you just dropped inside. Navigating Between Desktops There are three ways to move between desktops. The first is to simply click a thumbnail image. You'll immediately leave Mission Control and jump to that desktop. However, there may be times when you want to review available desktops before jumping into one. To do this, hold down the Control Key while pressing the arrow keys on your keyboard. You'll move from desktop to desktop (the Exposé area will also change accordingly) without exiting Mission Control. Additionally, you can use a three- or four-finger swipe on a trackpad (use two fingers on a Magic Mouse) to move between desktops. The final method is exactly moving through desktops via Mission Control, but it's sort of the same thing. You can move between open desktops without launching Mission Control by swiping with either three or four fingers (configurable via System Preferences) on a trackpad or with two fingers on a Magic Mouse. Moving Applications Between Desktops The whole point of this feature is to keep your current workspace uncluttered. For example, you can keep Mail on one desktop, Twitter on another and TextEdit on a third. Of course, you might want to switch up the order at any time. Here's how to move applications between desktops with Mission Control. There's only one real way to do this, and it's pretty darn simple. First, open Mission Control and navigate to the desktop containing the app you'd like to move (the Control > arrow key method is best here). Next, click-and-hold on that app's window (or stack of windows) in the Exposé area, and drop it into the desired desktop. It'll be moved, but you'll stay on the original desktop. Note that if doing so "empties" a desktop -- that is to say, leaves it without any applications -- it will remain. I'll discuss closing unwanted desktops later in this post. Jumping to A Desktop As mentioned earlier, this couldn't be easier. Simply click the desktop you'd like to work in. Conversely, use the three- for four-finger swipe gesture to move between desktops without opening Mission Control. Closing Unwanted Desktops This couldn't be simpler. To close an unwanted desktop, you've got two options. First, mouse over the thumbnail image and let your cursor sit for a second or two. A black-and-white "X" will appear in the upper left-hand corner. Give it a click and the desktop disappears. The less-than-patient can press the Option key to bring up the X immediately. Note: you cannot close Desktop 1 or the Dashboard with this method (in fact, you can't dismiss Desktop 1 at all). How it Works - Exposé Along with Spaces, Mission Control has used its Borg-like powers to assimilate Exposé. Beneath the vertical row of desktop thumbnails is the Exposé area. Here's what to expect from Exposé via Mission Control. When Mission Control is launched, your current desktop "recedes" into your display and is presented on a linen background. The Exposé shows all of the documents that are currently open. As I explained, these documents are sorted by their parent application. Each "pile" of windows bears that application's icon for quick reference. To jump to a given app, simply click its pile. Of course, those piles present a problem...they're piles! What's behind the first item? To find out, move your cursor over each item in the pile. You'll notice that the blue focus border appears over each document in turn. Once that happens, hit the Space Bar to get a Quick Look-style peek at that document. If that's one you'd like to jump to, click it. Mission Control Preferences Unlike some of Lion's other marquee features (I'm looking at you, Launchpad), Mission Control offers a huge amount of customization via preferences. Here's what you'll find. Open System Preferences and then click Mission Control. The control panel is divided into three sections: general preferences, keyboard and mouse shortcuts and finally hot corners. There's a lot of fiddling to do in here, so let's take a look at each section. General Preferences Here you've got three options. Show Dashboard as a space. De-select this option to remove Dashboard from the horizontal row of desktop thumbnail images. Those uninterested in using Dashboard or widgets might want to do so. Automatically re-arrange spaces based on most recent use. This is kind of handy. Mission Control will keep the desktops you're using most often next to each other, making the back-and-forth even easier. When switching to an application, switch to a space with open windows for that application. For example, if you've got Word open in Desktop 3 while you're working in Twitter from Desktop 1, and then select Word with a Command-Tab, you'll jump right over to Desktop 3. De-selection this option prevents the leap; you'll select Word but stay in Desktop 1. Keyboard and Mouse Shortcut Preferences Prepare to go nuts, keyboard jockeys. There are a huge number of options for launching Mission Control, revealing application windows, showing the desktop and finally showing the Dashboard. I won't go into detail here because this post is long enough. Suffice to say, if you have a keyboard shortcut or mouse click in mind for producing any of those functions, you'll probably find it here. Hot Corners Preferences Finally, click the Hot Corners button in the lower left-hand corner to assign a corner of the screen to a given Mission Control function. Then, you can simply move your cursor to that corner to produce the desired function. Dashboard Finally, a word on Dashboard. Other than a launch option (you can view it as a desktop thumbnail or not), there's nothing new in Dashboard. So, there you go. Bits and Bobs There are a few little things to keep in mind regarding Mission Control. Desktop images appear in the thumbnail images. Some people use certain desktop images to quickly identify workspaces. Mission Control represents each desktop's image (or wallpaper) in its thumbnail. Two screens = two Mission Control UIs. Those running two displays will find two distinct Mission Control UIs. You cannot move applications from a desktop on Display A to one on Display B. You can't re-arrange windows, etc. within the Exposé area. It reflects their current position only. Fiddling must be done on the desktop itself. Forget about scripting and other high-level geek stuff. Mission Control is for home users and LaunchBar wizards will want to look elsewhere. Now, a couple closing thoughts. For the first time, I'm using Spaces. It's really the swiping that makes it useful. I'm in front of the app I want in less than a second, and no workspace becomes especially cluttered. As for the Exposé area, yeah, it gets pretty cluttered despite the fact that its very purpose is to prevent clutter. Once you've got several documents open across applications, the piles pile up, if you'll forgive that poor analogy. I also wish I could move apps between desktops on different displays. Minor quibbles, really. I've been using and enjoying Mission Control and suspect that many of you will, too. The images used in this article are taken from the upcoming Apress book Taking Your OS X Lion to the Max.

Patent hints at Apple's Spaces on the iPad
PatentlyApple has dug up a patent application Apple filed with the USPTO, which demonstrates that Apple is at least considering bringing Spaces to the iPad. While not mentioning the iPad by name, the patent does say that "In some embodiments, the device [for this patent application] is a desktop computer. In some embodiments, the device is portable (e.g., a notebook computer, a tablet, or a handheld device)." Apple notes that the current method of switching between windows or applications on a device are "cumbersome and inefficient," requiring multiple presses or clicks which "create a significant cognitive burden on a user" and take longer than necessary, therefore wasting energy. Apple suggests implementing Spaces on touch screen devices via a two-finger pinch in the corner of the screen. This two-finger pinch would display a grid of all open spaces or virtual desktops. The user could then use a single finger to swipe the selected Spaces grid into full screen view, thus enabling that Space. Once again, we remind readers that Apple typically patents things that never see the light of day, but this hypothetical Spaces technology on the iPad would by much more user friendly than the current multitasking options available, which require the user to double-press the iPad's Home button then swipe a row of apps at the bottom of the screen before finally selecting an app to activate.

Windows Live Spaces throws in the towel, sends users to WordPress
Are you a proud user of the Windows Live Spaces social networking / blog publishing service? Since the halcyon days of 2006, Spaces has been helping users connect with each other (and publish their Get A Life! fan fiction), but no longer: under a new plan announced yesterday, users who sign up for a Live account will be instead sent to WordPress, and users who already have Spaces accounts will be given a couple options: delete the site entirely, download the data, or migrate to WordPress.com. According to Huffington Post, this is all part of a new corporate strategy that sees Microsoft working to "play nice" with other people's solutions, and as such the company is assuring users that existing code and content will be compatible with (or convertible to) WordPress. This is also, obviously, part of a strategy to pull the plug on services that aren't makin' any money. All we can say is: we're having flashbacks to the great Geocities disaster of 2009, and it's not pleasant.

GDC: The UI of The Beatles Rock Band
Most UI panels at the Game Developers' Conference tend to be full of dry technical information, all about how the team developed their own font kerning tool and organized menu elements in a data-driven fashion. The Harmonix UI panel this morning hosted by Senior Artist Kevin McGinnis did have that stuff (McGinnis is a self-diagnosed font geek, and did sound overly excited about formatting bitmaps), but it was also full of art -- beautiful The Beatles: Rock Band inspired art. McGinnis talked about the different concepts the team had tried -- they first attempted to do a very clean, serene respectful version of the menus, but then decided to go much more colorful. They hired a few artists to build the menus up into actual 3D spaces (after accidentally telling Apple Corps that yes, the menus would all be animated), and McGinnis even showed off the 3D model that the camera zooms around in to guide the player into the game. You can see all of the art in the gallery below, from the various pieces of flair to the menu designs and concept work. %Gallery-88131%

What's that menu item mean on my Mac?
Ever since you've started using your Mac, you've been looking at those icons towards the top right of your display in your menu bar. These items can direct to many different things, from connecting to a wireless network, to finding items on your Mac. These items not only can be clicked on to show a pop-up menu to perform actions, they can also indicate activity depending on what that icon if for. Here's a summary of some of the most widely-used icons, some menu items you might not have seen before on your Mac, common applications that have uses for menu items, and some extra functions in these items. Spotlight: The Spotlight menu item provides an easy shortcut to finding files on your Mac. Clicking it will show a search box directly under the menu bar, and will provide a summary of results when searching. This icon will also indicate when your Mac is indexing new search results, like when you plug in a external hard drive, by a pulsing dot inside the magnifying glass. Bluetooth: This icon (which is a Bluetooth logo) will show the current status of Bluetooth on your Mac. If Bluetooth is turned on, it will simply show the Bluetooth symbol. If it's turned off, the item will appear faded. If the Bluetooth part has been unplugged, it will slow a line and it will also appear faded. If your Mac is connected to a Bluetooth device, it will show three dots along with a faded Bluetooth logo. If your Mac is connected to an Apple Wireless Keyboard or Mouse, there will be a low battery warning displayed on the icon if their batteries are running low.

Office 2008 and Spaces issues, finally fixed in Snow Leopard?
One feature of Mac OS X, sometimes forgotten about, that has caused gripes from many users for a long time is Spaces. When it was first introduced almost two years ago in Leopard, some applications would not always "play nice" with each other, causing windows not to display or move correctly. Microsoft Office applications in particular were prone to these problems. There were always some nagging issues that would not allow Spaces to work correctly, due to the way Office windows are drawn on the screen. Over time, they started working better, but a few issues still remained with Office, especially in Word when the Toolbox floating window was in use. With Snow Leopard's debut, however, Microsoft states that these issues have been fixed through "collaborative efforts" with Apple. Hopefully, this will help a lot of eager and frustrated Spaces users manage their many windows on their desktops. Do you use Spaces, or have you held off because of these issues? Leave a comment below and share your experiences!

Mac 101: Spaces for your screen and brain
Have you ever needed more room on your screen? Or have you ever needed a way to organize all the stuff you are working on with your Mac? Mac OS 10.5, aka Leopard, debuted a feature called Spaces: a way of creating extra screens on your Mac. Think of them as virtual workspaces, where you can easily drop application windows to reduce clutter or simply focus on one thing at a time. To activate Spaces, go to System Preferences > Exposé and Spaces > Spaces. From there you can enable from 2-16 "spaces" (virtual screens) and you can fine-tune application behaviors. For example, I have Skitch set to appear in Every Space, which simply means it'll appear in whatever space I happen to be working in when I open Skitch. Normally switching to an application will take you back to the space you left it in (you can turn this off in the preferences).The really awesome thing about Spaces: it's like Exposé on steroids. If you're used to hitting a key and seeing all open windows, now you'll be able to hit a key and see all windows in all the Spaces you have open -- thus expanding your screen real estate considerably. Plus, you can use the two together. Hit a key to see all Spaces, then hit your Exposé key to see all the windows in every Space. You can also easily drag windows to another space either in the zoomed out view or just by pulling a window to the edge of the screen (depending on which space you wish to travel to). It's hard to explain, so watch the video to see what I mean.Note that there are some apps (Microsoft Word 2008 in particular) that don't play well with Spaces, so your mileage may vary.Want more tips and tricks like this? Visit TUAW's Mac 101 section.

Mac 101: Drag an entire application from one space to another
Spaces is a very nice way to manage all of your Mac's applications. You can have certain applications set to open in certain Spaces, and you can drag windows between spaces by clicking the Spaces application icon in the Dock (or menu bar). But did you know there is a simple way to drag all of application's windows between spaces?To do this, simply launch Spaces (using either a key combo, Dock icon, or menu bar item), then find the application whose windows you wish to move from one Space to another. Command + drag one of the windows, and all of the windows from that application will follow. It's that simple. Want more tips and tricks like this? Visit TUAW's Mac 101 section.


