The Mog Log: Exploring Final Fantasy XIV's 2.4 dungeons

The first time I ran the new dungeons added to Final Fantasy XIV in patch 2.4, I was kind of surprised. They seemed a lot harder, and I hit more wipes on the way to the end than I had while learning the 2.3 dungeons. After a couple of additional runs, though, I don't think they're really all that bad, just replete with mechanics that are sort of designed to trip groups up and with more than a few nasty surprises.
It also helped that I was running with Ninja after the first runs, so that felt more natural.
As it's been less than a week since the dungeons were added, it seems like a fine time to give you lovely folks a guide to what's going on in here and what needs to be done. So let's chatter about the new dungeons you'll be running in Expert roulettes for that beautiful poetics armor.
Snowcloak
For the first time, a dungeon unlock is part of the main story post-Praetorium! Don't worry; you don't have to go far. Snowcloak is also the easiest of the three dungeons and very pretty besides. You have to take at least one trip through it, but it's easily pegged around the challenge level of Hullbreaker, with fairly simple boss fights and no terribly irritating pulls aside from one sequence near the end.
Wandil: Hold on, did this boss actually happen? He's kind of a non-starter. Tank him over on the snow patch by the exit, and have DPS burn down the bombs that spawn, which is not an arduous task. He will periodically put a stacking debuff on everyone; when it hits four stacks, players become frozen and stunned for a short time. Despite the sound of that, it's pretty much a snoozefest of a fight, and I'm relatively sure he had more mechanics that I missed because, well, they didn't slow us down at all. It's an easy fight with minimal coordination.
Yeti: This one is also pretty easy but fun. Spriggans and ogres will spawn. The tank's goal is to hoover up the spriggans and have them in front of the Yeti -- he does a long conal AoE that they can get caught in, turning them into snowballs. When he starts casting his big AoE effect to hit the whole room, you hit the snowballs into him to interrupt him. The ogre adds can just be handled by DPS; they're chumps.
To Oblivion: There's a big circular room that serves as the dungeon's big event battle leading into the final boss, with a bunch of quick spawns as you kill each wave. I sort of hated tanking it, but I was also a bit out of practice. It's also worth noting are that the Chary Harriers have the same mechanic as the Haranguing Harriers from Stone Vigil; stun/silence them to prevent them from turning into dragons, and kill them first.
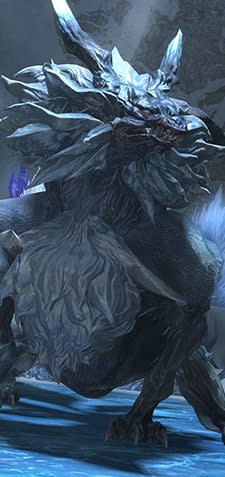
Fenrir: Remarkably easy. Fenrir summons three icicles into the room, two of which fly through it as straight-line AoEs after a second; moments later, the remaining icicle explodes. He has two other big attacks: a room-wide hit called Thousand Year Storm and Lunar Cry, the latter of which is a room-wide line-of-sight AoE that deals damage and makes people a target for Moonlight Fang and a few other painful hits. So the fight has a steady rotation. First wave of icicles drop, dodge the AoEs, get hit by Thousand Year Storm. Second wave drops, dodge the AoEs, hide behind the remaining icicle when he casts Lunar Cry, then move out from the area before it explodes. Third wave same as the first, and so on.
Sastasha (Hard)
I've already seen people swearing off Sastasha forever after a single run. I don't think it's great, but it doesn't quite deserve that degree of loathing. All of the fights can be managed pretty easily once you know what's going on. Figuring out what to do can be another matter altogether. But you get two rematches in here, which is fun!
Karlabos: The guy has two main abilities he'll use. First, he'll randomly hit people with a debuff that causes damage over time and needs to be cleansed promptly. Second, he'll do an attack called Tail Screw that deals massive damage to a single target, easily killing softer targets and nearly killing anyone. Before he does that, he stuns the tank. A DPS needs to handle stunning duties, or powerful healing is required to bring someone back up. Despite this, he's not too tough otherwise.
Minibosses: On the road to the second boss, there are two miniboss fights against lamias. Each consists of one "main" enemy in the center, two satellite enemies, and several bubbles of Brine moving to the central enemy. Killing the Brine produces a burst of damage to all party members, but if it hits the central lamia, it heals her. Take out the bubbles before she gets healed, kill the center, then move on to the other two. It's mostly a coordination check.
Captain Madison: This fight annoys me. Not because it's too hard, exactly, but because it's a joke until it just starts killing you. The Captain will periodically start shooting someone, you see. Each time he shoots, he gets a stacking damage boost. Hitting him enough will break him out of it. Toward the end of the fight he goes nuts with this, turning the fight into a hard DPS race... which is the only thing he does that isn't more or less irrelevant. He has adds that are quickly dispatched, his other tricks are pretty irrelevant, it's just that shooting. And the shooting at the end can easily start dropping party members quickly, at which point it turns into a wipe despite the fact that 70% of the fight is basically just by-the-numbers.
I have heard some people report that running through him whilst he's shooting helps matters. I have not seen this to be the case myself; perhaps it's just a problem if you're playing melee.
Kraken: A rematch, and it's quite different. This time, the body is your target. The flow of the fight is fairly straightforward. Everyone starts by killing the arms, while the tentacles can be safely ignored. Once the arms are dead, you can beat on the boss's body, with two safe spots for melee near the bank at the edge of the arena. Failing to kill the arms results in big damage on the whole party.
At half health and below after he's tried and failed to cast Stranger Tides (which is the attack that hits hard if arms remain), he'll summon a big pile of arms around the room. The arms will spam Clearout around them, so the best plan here is for everyone to bunch up around one arm in the aforementioned safe spots, kill it, and then beat on the boss until he goes back to arms-and-tentacles on the field. Worth noting is that the boss does still need to be tanked through the fight, as he has a ranged attack that will murder a healer or DPS pretty quickly.
Sunken Temple of Qarn (Hard)
Readers may recall that my opinion on the original version of Qarn was pretty darn negative. This one, however... well, I don't know. I don't hate it, but I can't say I particularly love it. It's there! The bosses are neither particularly fun nor terribly complex, and the tomb-exploration feel is largely minimized. It's a bit of a missed opportunity. It's more straightforward than Sastasha, though.
Damaged Adjucator: The body is your main target, but it's highly resistant to damage. Out of his three body parts, one of them will glow; when the glowing part is destroyed, the body collapses and a group of yarzons spawn, then the boss respawns after a moment with less health on his body. You repeat this a few times, then you just have to take down the last 5% of the body's health.
The yarzons are chumps that barely even need to be tanked, and the boss has only two main abilities worth noting. First, he'll target someone and throw a sand orb at her; run to the edge of the room to drop it off, then clear out as it lets out a pulsing AoE damage field. Second, he'll summon swirling pits of quicksand in the middle of the room, which need to be escaped from quickly. You've got 10 seconds before the sands swallow and smother you. Once you get the feel for getting out of quicksand and watching the glow, he's a chump.
Minibosses: On your path to the second both there are two fights against head statues with disembodied hands. The hands will grab someone and immobilize him, then the head will target that person with a high-damage laser. The first fight has one hand, then another hand spawning partway through. The second fight has two hands, then another hand spawning during the fight. Kill the hands quick, prioritizing someone trapped in the path of a laser, then kill the head.
Sabotender Emperatriz: The Emperatriz has one core mechanic. Periodically, he starts counting his needles as he charges for 100,000 Needles. Enough damage done to the target will knock him off of his count. Each time he starts charging, he summons a cluster of adds, which should be ignored until he has lost count of his needles again.
He starts with two small adds. Then he summons four more small adds, then four small adds and one big one, then four small and one big again with a twist. The last wave sees the big one put a damage shield on the boss, so you need to kill the big guy, knock the boss out of his count, and then kill the rest of the adds. If DPS is on the ball, it's a cinch. There are a few things on the ground to avoid, but they're telegraphed and easy to run out of.
Vicegerent to the Warden: Sarcophogi emerge throughout the arena during the fight, resulting in large lines of mummies running from the coffins to the edge of the arena. Functionally, they're akin to slow-moving AoEs. Touching them gets you a stack of mummification, and four stacks turns you into a mummy for about 20 seconds. He also has an untelegraphed straight-line attack that he uses when his sword starts glowing with an impure light, and near the end of the fight he'll target someone and channel stacks of mummification on her until she gets mummified. (He also seems to ignore aggro during that stage whilst hitting like a chump.) It's a dodge fight, in short, and once you see it in action, it's easy to flit away from things and just pound him down whilst avoiding as many mummies as possible.
Those are all the tips that I have after the first few runs through these dungeons. I may have missed something, but it should help you get through for your first few runs. Now get good and start getting those tomes.
Feedback, as always, can be left in the comments below or sent along to eliot@massively.com. Next time around, as we're finally though the main crush of fanfests and patch drops, there's space to talk about the lore of the patch and what's coming next.
Chocobo Dash!
Oh, we're still going! Episode 28 covers our post-Fanfest feelings, while Episode 29 focuses on the patch and a bit of that old Ninja magic. Speaking of dual-wielding assassins, I ran into a bunch of them in The Final Fantasy Project while moving through Final Fantasy IV. Then I totally ignored imminent danger to go beat up some royalty.

From Eorzea to Vana'diel, there is a constant: the moogles. And for analysis and opinions about the online portions of the Final Fantasy series, there is also a constant: The Mog Log. Longtime series fan Eliot Lefebvre serves up a new installment of the log every other Monday, covering almost anything related to Square-Enix's vibrant online worlds.
