How to turn a Raspberry Pi into a game console
All you need is the Pi and about half an hour of free time.

By Thorin Klosowski
This post was done in partnership with Wirecutter. When readers choose to buy Wirecutter's independently chosen editorial picks, Wirecutter and Engadget may earn affiliate commission. Read the full guide on how to turn a raspberry pi into a gaming console here.
The Raspberry Pi is a $35 computer that can do a lot of things, but few projects are as popular as turning it into a retro-gaming console; imagine something the size of an NES or SNES Classic mini console with a few hundred games on it instead of a few dozen. With about half an hour of free time and some lightweight technical know-how, you can convert this card-deck–sized computer into a console capable of emulating nearly every classic video game system from the 1970s, '80s, and '90s.
The tools you need
Emulation is best done on the newest, fastest Raspberry Pi, because even old games require a lot of processing power. However, for the time being we're recommending the Raspberry Pi 3 for this project, not the just-released Raspberry Pi 3 B+. The 3 B+ is a little more powerful and has improved wireless connectivity, but not all operating systems, including our pick for this project, Recalbox, have been updated to work with it yet.
Most people will be fine with a 64 GB (or less) microSD card for storing the operating system and games. Generally, games for older, cartridge-based consoles need less space, while games for newer, CD-based consoles need more.
The kind of controller you need depends on the type of games you want to play; we like the DualShock 4 controller if you plan on playing both 2D and 3D games, or the Buffalo Classic USB Gamepad for 2D games.
Any Raspberry Pi 3 case will work, but we like this one that's shaped like a Nintendo Entertainment System and has a functional power button. You'll also need an HDMI cable and access to a Mac or Windows computer for the setup process. I also keep a mini wireless keyboard like this one around to help deal with any troubleshooting, but that's optional.
How it works
An emulator is software that makes a computer work like another computer. There are emulators to make your Raspberry Pi work like a video game console, such as a Nintendo Entertainment System, Sega Genesis, PlayStation, or even a DOS-based PC. Most games come in the form of individual files called ROMs, named for the read-only memory chip of the game cartridge they were originally copied from.
ROMs are usually copyrighted material; making a digital copy of your own cartridges for use on these emulators is a legal gray area and usually requires specialized hardware, but companies like Nintendo have made it clear that they consider using emulators for games without permission from the copyright holder illegal. Some independent developers make original games, referred to as "homebrew," for classic consoles, and this is completely legal. Popular homebrew games include D-Pad Hero, Alter Ego, and Blade Buster. If you're curious about the homebrew scene, ROMhacking is a great site to start with.
Using a Raspberry Pi as a game emulation machine is such a popular project that several operating systems exist for this sole purpose.
Using a Raspberry Pi as a game-emulation machine is such a popular project that several operating systems exist for this sole purpose. Each operating system includes emulators for nearly every console that's ever existed, from popular consoles like the Super Nintendo to more obscure systems like the Sinclair Spectrum.
RetroPie was the first operating system like this, but others have followed, including Recalbox and Lakka. For this guide, we'll use Recalbox, which is the easiest to set up and maintain. RetroPie can do more things than Recalbox, like supporting classic controllers hardwired onto the Raspberry Pi GPIO or playing games online, so if you're comfortable with Linux and don't mind tinkering you'll be able to customize it more thoroughly, but RetroPie and Recalbox run mostly the same emulators, so gameplay won't differ much.
Building a cheap emulation machine with a Pi comes with caveats. The Raspberry Pi can reliably emulate older, 2D-focused consoles like the Nintendo, Super Nintendo, or Sega Genesis. When it comes to 3D consoles, PlayStation titles work well, but Nintendo 64 and Dreamcast games are hit-and-miss, and emulators for newer consoles usually aren't even included because the Pi isn't fast enough to run them. You might notice some input lag on certain games (this can sometimes be fixed by turning Game Mode on in your TV settings), especially if you're using Bluetooth controllers. You'll run into other quirks, too—the sound might randomly cut out, or the Raspberry Pi may stop outputting video for no reason. These things don't happen often and troubleshooting is arguably part of the fun of a Raspberry Pi project, but keep in mind this isn't as reliable as an off-the-shelf product.
Burn Recalbox to an SD card
As with any Raspberry Pi operating system, the first step is downloading and burning (writing) a file to a microSD card:
On your Windows or Mac computer, download the newest version of Recalbox for your Raspberry Pi model.
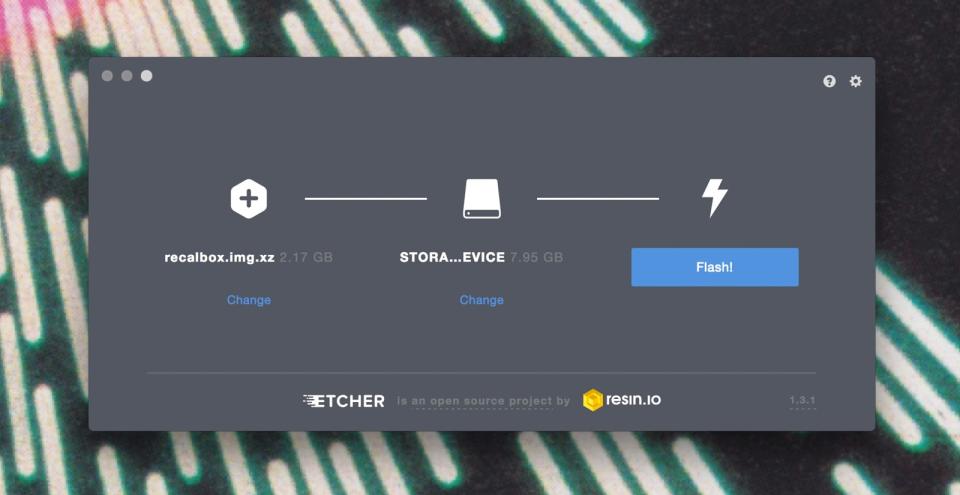
Download and install Etcher, free software used to copy Pi operating system images to SD cards.
Insert your microSD card into your computer. If you don't have a built-in SD card reader, you'll need to buy one.
Open Etcher. Click Select Image and find the Recalbox file you downloaded in step one.
Click Select Drive and click on your microSD card. Then click Flash! and wait for Etcher to copy the image.
When it's done, take out the SD card, insert it into your Raspberry Pi, plug in your controllers, then plug the Pi into the power supply and your TV or monitor.
Set up Recalbox
When you first boot up Recalbox, it will automatically run through a few setup steps, so let it do its thing until the main menu pops up.
Recalbox includes several free homebrew games for different consoles. If you don't immediately see a console you're looking for, that's because Recalbox hides any emulator that doesn't have a game installed. If you have a supported USB controller hooked up, you can navigate the menus with the D-pad or use a keyboard to do the same.
Before you start playing games you'll want to configure a few things:
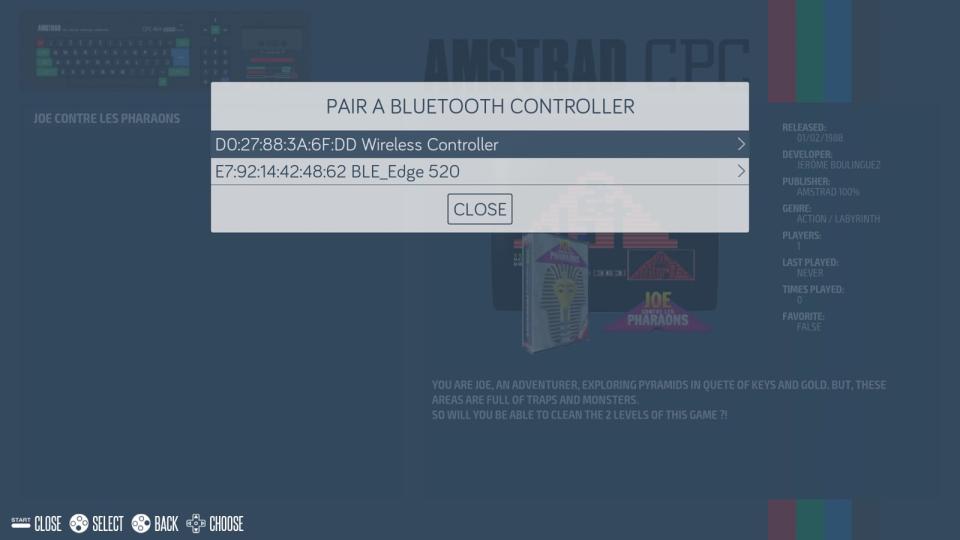
Configure your controllers: The buttons on most popular wired controllers, including the Buffalo USB controller, the Xbox 360 and Xbox One controllers, and the Sony DualShock 4 all work out of the box, but you can remap buttons if needed, press Start, then select Controller Settings. If you need to remap buttons on a wired controller, select Configure a Controller, then select OK, and follow the on-screen instructions. To set up a Bluetooth controller, press Start and then Pair a Bluetooth Controller; put your controller into pairing mode, and then select the controller's name when it pops up on the screen.
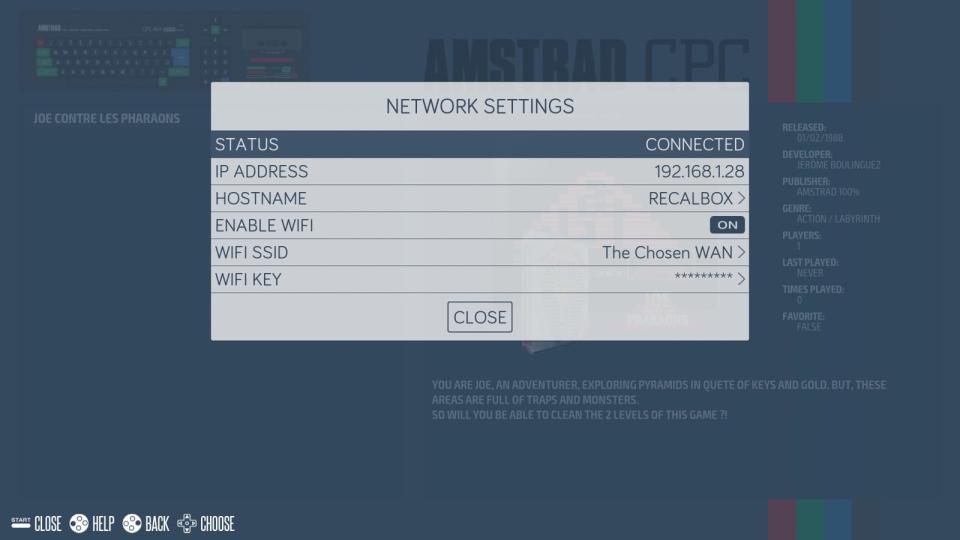
Connect to your wireless network: If your Raspberry Pi is connected to your router with an Ethernet cable, you can skip this step, but if you want to use Wi-Fi you need to enter your wireless credentials. Press Start and click on Network Settings. Enter your Wi-Fi's SSID and password using the keyboard on the screen. Once that's all set up, you will be able to access your Raspberry Pi over your network from your computer to transfer files and change basic settings (we'll detail how this works in the next section).
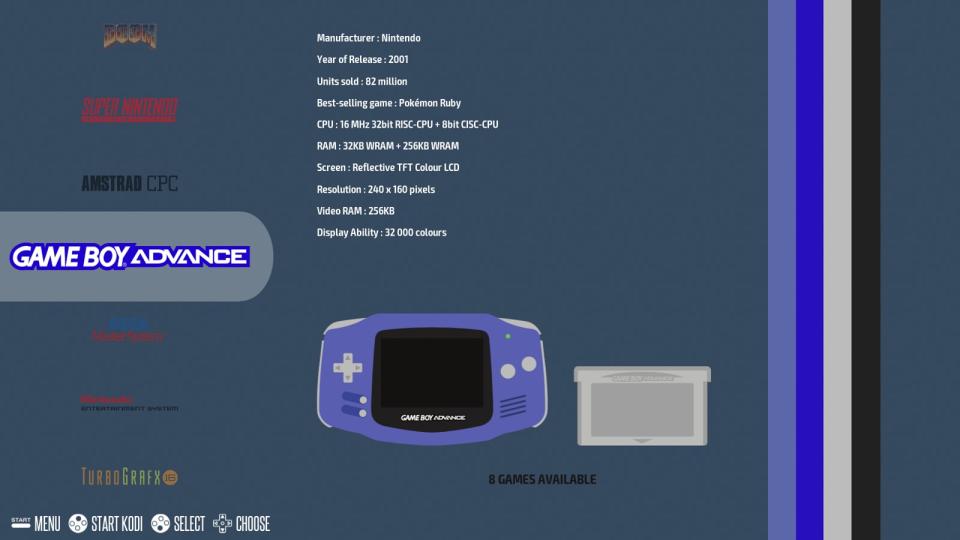
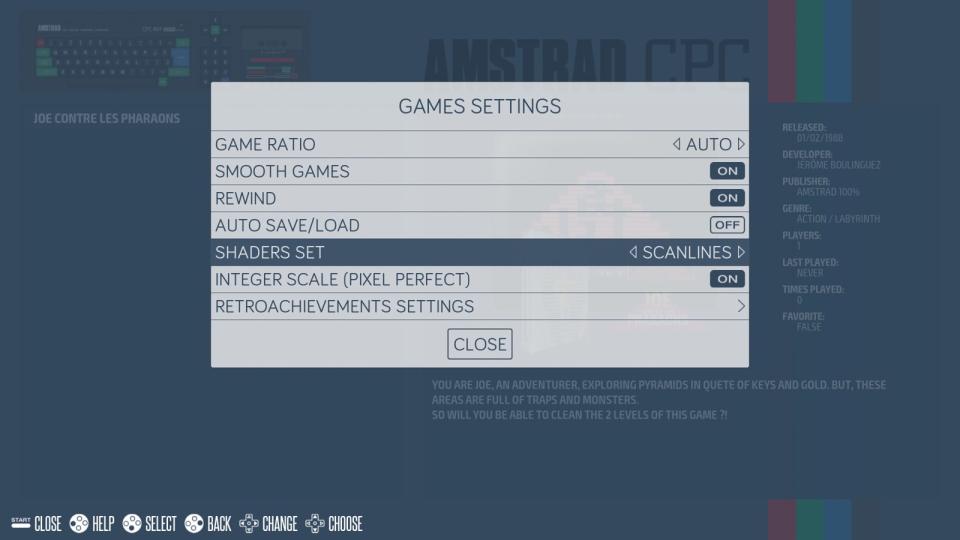
Pick your shaders: Older games can look odd on a modern television. To account for this, emulators can use shaders, which mimic the image appearance of old TVs and LCD screens. Recalbox includes two options for this: scanlines, which adds horizontal lines to the screen like a tube television, and retro, which automatically picks a different shader style based on the console. For example, an NES game will have scanlines, while a GameBoy Advance game mimics the grid you would see on the original handheld's LCD screen. To choose a shader, press Start, then Games Settings, then Shader Set. Most people can set it to Retro and leave it there. You can add your own custom shaders, but it's a bit complicated.
Once you're done with the setup, scroll through the included games and give a few of them a try to make sure everything is working as expected.
How to copy games to your Raspberry Pi
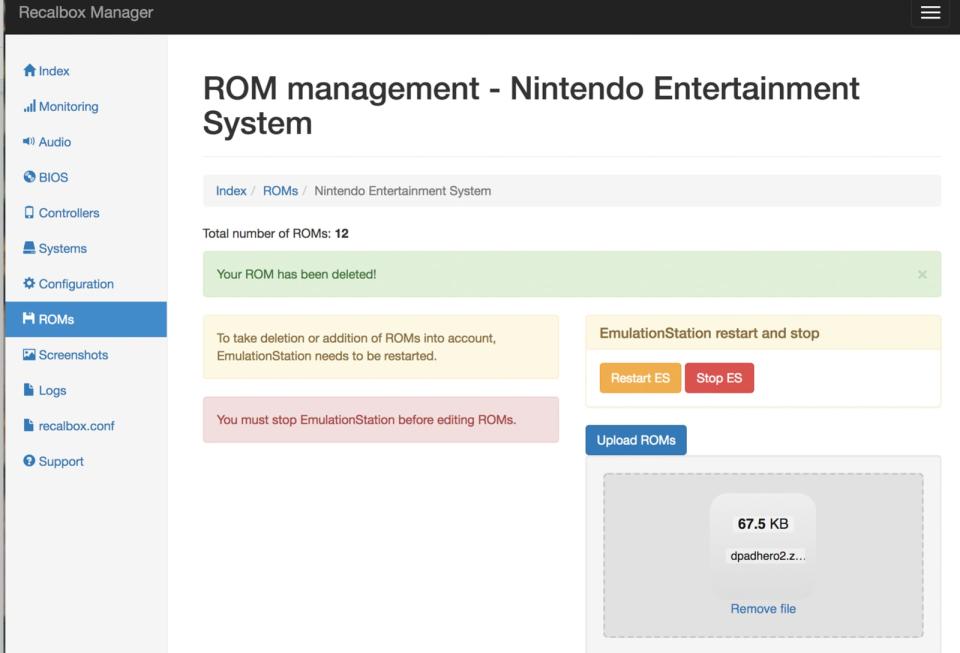
Recalbox includes a basic file and configuration manager you can access within your home network via a Web interface in your browser. Using this Web interface, you can copy ROMs over to your Raspberry Pi, manage basic settings, and more. To show how to transfer a ROM from your computer to the Pi, we'll use a copy of D-Pad Hero, a free homebrew NES ROM.
Download the D-Pad Hero file.
From your computer's Web browser, head to http://recalbox/ if you're on a Windows computer or http://recalbox.local/ if you're on a Mac computer.
On the Recalbox manager page, click the ROMs button on the sidebar.
Click the Nintendo Entertainment System folder. You need to put your ROM files in the folder for the console it's on.
Click Upload ROMs then drag and drop the D-Pad Hero file you downloaded in step one into the box in your browser. When it's done copying the file, click Restart ES and you can head over to your Raspberry Pi to play it. You can select and upload multiple ROMs at once.
The Recalbox manager can do other things, too. You can access a variety of settings from the Web manager, including wireless network settings and shaders. You can even press a button to take a screenshot when you're playing games. If you don't like the browser-based manager, you can also access your Raspberry Pi in Windows Explorer or Finder on Mac, similar to how you'd use a network-attached storage device.
How to save, load, and exit games
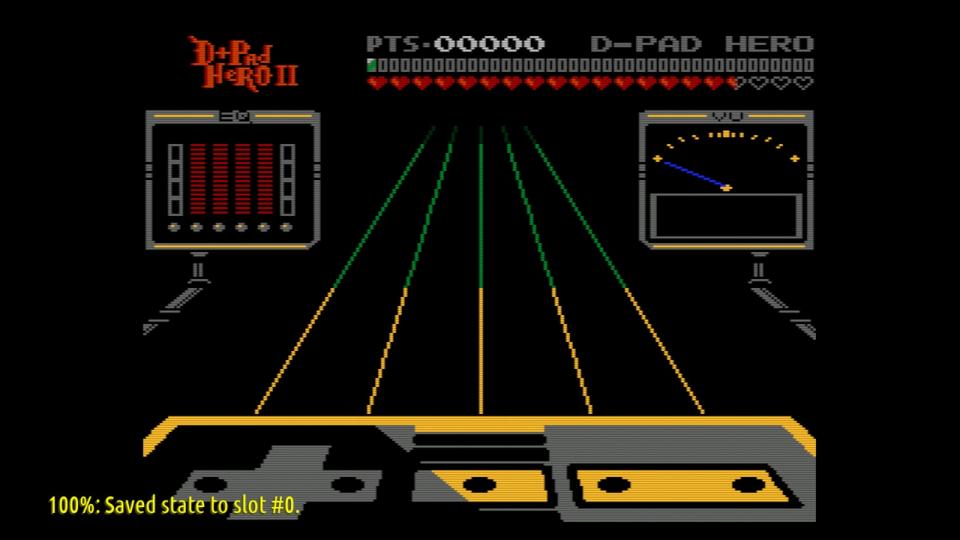
Emulators allow you to save games, even in old ones that don't have a built-in save system. These are called "save states," and they saves the exact moment you're at in a game. In order to save, load, and exit games on Recalbox, you use hotkeys by tapping two buttons on your controller at once.
If you have a PS4 controller, the hotkey is the PS button. If you have a classic controller like the Buffalo controller, the hotkey is the select button. On an Xbox controller, the home button is the hotkey. The button assignments are based on the Super Nintendo controller layout, so use whatever button is in that location on your controller. Here are some useful shortcuts to get you started:
Hotkey + Start: Quit a game
Hotkey + Y: Save state
Hotkey + X: Load state
Hotkey + A: Reset game
Recalbox has a lot of tricks up its sleeve beyond the basics we've covered here, so be sure to check out the manual for extra guides and troubleshooting tips.
This guide may have been updated by Wirecutter. To see the current recommendation, please go here.
When readers choose to buy Wirecutter's independently chosen editorial picks, Wirecutter and Engadget may earn affiliate commissions.
