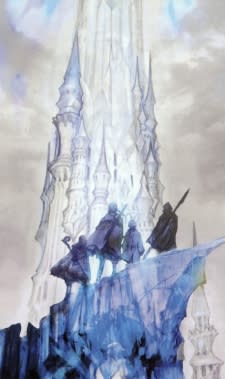
The Mog Log: Final Fantasy XIV's Crystal Tower

Let me be up front with you, dear readers: The Crystal Tower in Final Fantasy XIV is one of the most well-designed dungeons I have had the pleasure of playing through, ever.
Not just "in Final Fantasy XIV" but anywhere, ever. It's fun, it's clever, it's clean, it's engaging, it's freaking spectacular. If not for one minor wrinkle, it'd be a nearly unambiguously perfect bit of bliss. But I'll cover that part later; the important point is that right off the bat, this dungeons is something that I consider absolutely stellar.
Longtime readers will also know that large group content is generally not my thing. I dislike a big raiding endgame, and I'm not a fan of the style of play, so the idea that my current favorite dungeon in the game is a 24-man rush through the tower probably seems a bit odd. So let's talk about boss strategies, progress through the tower, and the one blemish on what is otherwise unambiguously great.
Upon first entering the tower, you head left to start down the path to the first boss. You also face your first challenges in the forms of huge swarms of enemies in fenced-off areas. Fights are sealed just like boss fights. Tanks have to grab the Valefors and point them so that the tail swipes won't hit the rest of the group while other tanks gather up the elementals, then the tanks grab the greater demons while other tanks grab the imps, and then tanks grab the succubus-type enemies after dealing with the cursed eyes. What makes this more complex is the fact that the rooms slowly flood with filthy water, forcing people to remain on the marked platforms to avoid taking constant and potentially lethal damage.
This is how the tower approaches trash pulls. There is a grand total of five in the entire dungeon, start to finish, and every single one is a spectacle of some kind. Instead of slow and painstaking pulls, the fights are steady and exert a pressure on the group to deal with enemies quickly and with an eye toward mechanics.
The first boss, the Bone Dragon, dies three times in the fight. For the main tank, this is pretty simple -- tank him on his platform facing away from the group, like most dragons. Everyone else has to do more. The dragon summons several skeletons periodically, and each one needs to be dragged to the end of the platform paths away from the center before being killed. More important yet, each skeleton needs to be killed at the end of a different path.
Why? Because the boss dies, and the skeletons get back up and start rushing toward him. If two of them are on a platform together, they both run; otherwise, they walk. A skeleton reaching the boss means a huge spike of damage to everyone in the room. So tanks, healers, and DPS have to keep burning down the skeletons at the end of different spokes, then swapping back to the boss, then trying to minimize their time in the water as the skeletons come back up and have to be killed before the boss resurrects for another round.
It's easy to see how this fight can lead to a wipe, but there's no failure point where this is an automatic wipe right away. A mistake will not doom the group. If a skeleton gets through to the boss, it'll hurt, but the healers can pick up and keep the group going. Only multiple skeletons getting through results in doom, at which point it's less of a mistake and more a matter of people not executing the strategy.
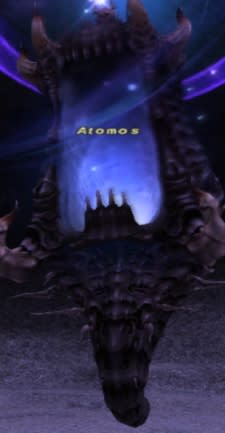
Once the dragon is down, you swerve right to the Atomos fight. Here, the three groups split up along three alleys. Each alley has a colored platform and an Atomos on a different-colored platform. Four people need to stand on the platform to take down the shield of the Atomos in another alley, which starts the creature in on summoning a variety of enemies. Three of the people not on the platform move up to damage the summoner, while one of the tanks grabs the enemies being summoned and drags them back for the platform standers to kill them, everyone racing to kill the maw before its summons overwhelm the groups.
One of the elements of the tower that was mentioned was the idea that sometimes the group will split up, and this is a perfect example of that. Each group does its own thing here, but it also relies on the other groups being smart.
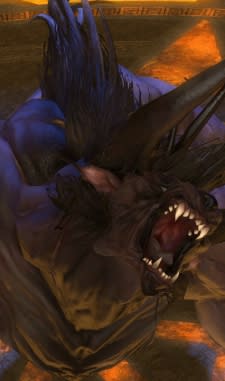
Boss number two, Thanatos, is surrounded by three Magic Pots. Once per minute, one group will be made ghostly, which is the only way that anyone can hurt Thanatos. That ghostly state is applied by the magic pots. So the pots need to be protected, Thanatos periodically summons Sandmen to attack the pots and tries to drag them to him, and various succubi spawn to kill people indiscriminately. Healers have to keep the pot up, DPS needs to kill adds and damage Thanatos during his window of vulnerability, and tanks need to juggle what they have on them at any given moment while dealing with taxed healers.
It's hard to make a fight feel frantic without feeling inherently chaotic, but Thanatos manages it. A lot of things are going on, and everyone needs to be aware of several things, but outside of hitting Thanatos hard when you can actually hurt him, the flow is pretty straightforward on a whole. It's my least favorite fight in the tower, but it's still really fun.
The third (and final) trash pull has three Vassagos standing and shackled to a bomb. The three groups split up again, each one taking on a Vassago in the circular arena. The central bomb can't be hurt until all three demons are dead, but there are several little bombs that spawn, including Allagan Napalm enemies that rush toward the center much like the skeletons in the Bone Dragon fight. So DPS has to aggressively knock out the little bombs, then focus on burning down the demons, then finally kill the central bomb.
When World of Warcraft gave us a series of dungeons that was nothing but boss fights in a circular arena, a lot of people took its general blandness to mean that we all do, in fact, want trash pulls. I think the central reason for boredom with trash pulls is that most of the time, they're boring. Crystal Tower has five trash pulls and four bosses, but every single pull has its own mechanics, and each of those mechanics teaches you something about enemies that come up later in the dungeon. The trash feels not like padding but like an interesting series of encounters.
King Behemoth fills his battlefield with electricity, a ticking damage-over-time effect that gets worse over time. There are four towers around the arena that can be activated to reduce this damage again, a necessity to avoid overwhelming your healers. Meanwhile, bombs spawn trying to blow up the towers, and various people are tagged with comets that leave behind rocks on the field. A tank needs to grab the king, another tank needs to grab the Iron Giant that spawns, and DPS needs to kill all of the adds, starting with the bombs.
It's when the King rears up that things get serious; he's casting Meteor, and you need to shield yourself. Specifically, you need to duck behind those comets lying on the battlefield. Once the meteor hits, it's back to the rest of the fight, stopping bombs, killing giants, and clicking towers.
King Behemoth is a great example of how to make fights interesting and engaging for 24 people without just giving a large pile of health to the boss. Healers will be heavily taxed, not because of huge damage spikes but because of consistent damage to everyone. DPS has to keep swapping targets, and though tanks get a fairly relaxing ride, they still have to keep their eyes open. It's an absolute monster of a fight to heal, but it's also really engaging.
The last boss arrives with no trash, just standing in the center of his arena. It's a circle with an added half-moon on the outside that's usually covered in lava. At first, you're in the circle and fighting him, dodging the elaborate damage fields that he uses rapidly. Every so often, however, the lava on the outside of the circle vanishes and a group of Iron Claws spawn.
At this point, four people per group need to rush to that outer section and stand on Atomos-style platforms; there are three platforms, and when all three have four people placed on them, a barrier is raised. It's a good thing, as the boss is about to cast a version of Flare that covers the room in destruction. So everyone rushes out when the platforms are available, erects a barrier, and then rushes back in after the room is safe (a couple of adds spawn between those two events). Each time, the patterns of damage he leaves on the floor get that much more elaborate and difficult to dodge.
I call this boss the bullet hell boss because you are constantly ducking around looking for that tiny spot on the floor where you can stand without taking damage. And it is always possible; I've healed through that fight without ever being so much as clipped by his many ground effects. Despite not being very hard, it's a very fun fight because there's something innately satisfying about ducking into the one spot that isn't dangerous during attacks that seem to fill the whole room.
After Acheron's dead, you get your final loot chest... and hopefully it's something you really want before you roll because once you get that piece for the week, you're out of luck until next week.
That, right there, is the biggest letdown in the entire offering. Letting players have only one piece of gear per week strongly discourages players from rolling on anything that they don't absolutely want, which means that a lot of loot goes completely unused. You see the "unable to obtain X" message a lot because everyone passed on something, not because it's bad equipment but because no one wants to win a belt when he could still use the chest.
I'm baffled as to why this decision was made -- preventing people from fully gearing up a backup job in level 80 gear? But the net result is that no one wants to take a lot of the items for fear that something better will drop later. Combine that with the slay-and-pray mechanic and it's a really dim choice. A better option would be getting a token once per week to turn in for one reward and keep the myth/philosophy stone rewards the same, resulting in the same actual rate of item acquisition.
Still, it's an awesome dungeon. I've been running it since it launched, and I look forward to taking another trip through, especially now that I finally got my healing coat from it.
Feedback is welcome, like always, in the comments below or via mail to eliot@massively.com. Next week, let's talk about beast tribe dailies, and the week after that, we'll cover why nobody likes Pharos Sirius.

From Eorzea to Vana'diel, there is a constant: the moogles. And for analysis and opinions about the online portions of the Final Fantasy series, there is also a constant: The Mog Log. Longtime series fan Eliot Lefebvre serves up a new installment of the log every Saturday, covering almost anything related to Square-Enix's vibrant online worlds.
