How to easily add secure FileVault passcode to your Keychain


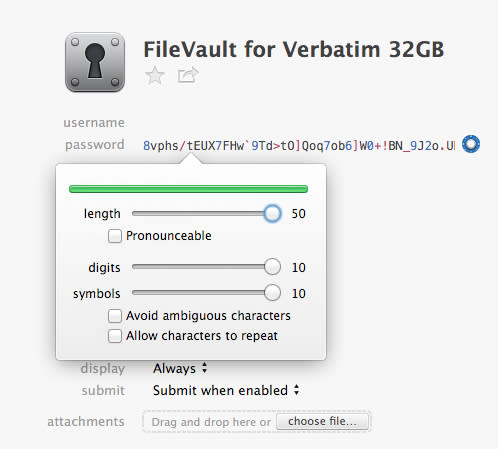
Since I have a terrible habit of losing things, I decided to encrypt my Verbatim "Tuff-N-Tiny" USB drive. This was a simple matter of control-clicking the drive name in Finder, choosing "Encrypt" and then setting an encryption password. I also decided to use 1Password to generate a nice, secure, long, random password:
I copied that password from 1Password and pasted it into the password field in Finder, and made a note in the "hint" field that it is stored in 1Password:
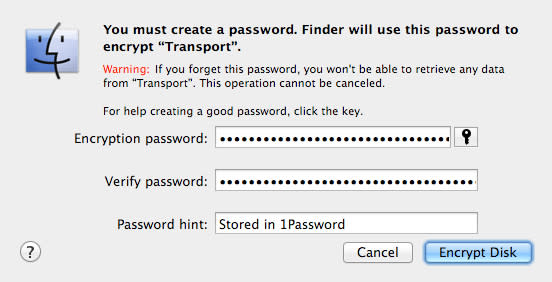
I clicked "Encrypt Disk" and Boom! done. I considered myself quite clever for being such a good practitioner of security practices...
...until I plugged the USB drive into another computer. As expected, the password prompt appeared. I switched over to 1Password, copied the password to the clipboard, and tried to paste it in to the prompt.
OS X would not allow me to paste into the password field.
I thought I would solve the problem by using Keyboard Maestro and have it simulate typing into the Secure Input password field, which is how I usually get around the "Can't Paste Here" problem. For some reason, it did not work, despite repeated attempts.
Suddenly I felt extremely stupid for making such a long, random, hard-to-type password. I was definitely not looking forward to re-typing it on each Mac that I might want to use with the drive. A less... peculiar ... person would have just changed the password to something simpler. But I wanted to know if there was a way to use the secure, long, random password without having to type it all in manually.
The drive can be mounted easily (and without requiring me to enter the password) on the Mac where it was first configured because the information is immediately stored in the Keychain. That gave me the hint I needed to figure out how to configure it on my other Macs.
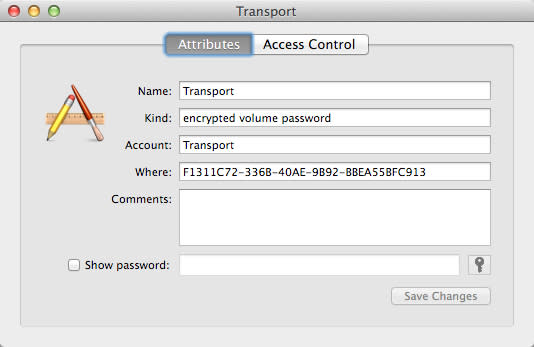
I went to the Keychain Access.app in /Applications/Utilities/ and searched for "Transport" (the name I had given the USB drive) and found this:
Aha! Now that I knew the correct information to put in the Keychain, I went to my second Mac (but did not put the USB drive in yet), launched Keychain Access.app and chose File » New Password Item... from the menu.
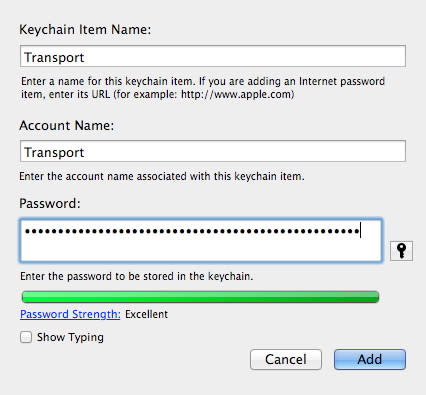
Put the name of the drive into the first two fields, and then put the password into the password field. Click Add. Then find the new entry in Keychain Access, and double-click on it. Change the "Kind" to "encrypted volume password" and copy the drive UUID to the "Where" field. Click Save Changes and quit Keychain Access.app.
Pro Tip: If you forgot to copy the volume UUID from the first computer, you can get it from the System Information.app under Hardware » USB and then select the drive. You will see the UUID in the information window.
Now you can plug in the USB drive, and when you do, you will see this prompt to allow access to the entry you created in keychain:

Be sure to click "Always Allow" unless you want to be prompted every time.
Whew! It might seem like a lot of steps, but it's pretty easy, and much easier than trying to type 8vphs/tEUX7FH'w9Td>tO]Qoq7ob6]W0+!BN_9J2o.Uh}jGz98 without making a mistake.
Update 2014-10-07: I discovered two additional tidbits today which might come in handy for anyone else who comes across this page later on:
If you are using this on OS X 10.7 (Lion), then you need to use "Encrypted Volume Password" instead of "encrypted volume password"
The reason that my Keyboard Maestro "insert plain text by typing" macro did not work was because I use Option/Alt+V and if you keep the Option/Alt key held down, it changes the characters which are typed. When doing this via ScreenSharing (which is how I was doing it), it seems impossible to release the Option/Alt key fast enough to avoid corrupting the typed password. However, this can be easily worked-around within Keyboard Maestro itself: I simply added an option to my Keyboard Maestro macro to insert as plain text by typing when I select a Status Bar (aka menu bar) item, and when I use that instead of Option+V it works! Which, of course, means that you do not need to go through the much more complicated process of manually adding this to the Keychain Access.app. Live and learn.
