How To Run MAC OS on PC
Many people have long time awaited to run the Mac OS working on windows PC, particularly on Intel and AMD models architectures. But their desires stay unfulfilled.
Even though running Mac OS locally on Windows PC equipment is unrealistic, there is alternative - running Mac OS X on an emulator.
In this article, I will elaborate you one of the method to introduce and run Mac OS X Panther on your PC utilizing PearPC emulator. This is a free tool to setup and run Max OS X on PCs. You can check out details PearPC's Emulator site.
Here are initial steps that to use PearPC emulator to install Mac OS X:
1. Download PearPC PowerPC Architecture Emulator.
2. Obtain HDD images for use with PearPC.
3. Obtain images of your client OS installation disk. (Note: You will require a license to run Mac OS X. You can easily do buy a copy of Mac OS X around $25-$35.)
4. Then, the final step is to configure PearPC to use that HDD image and the OS images.
Downloading PearPC
Download the PearPC PowerPC Architecture Emulator (file pearpc-0.3.1-win32-sdl-jitc.zip). When it's downloaded, extract it to C:\PearPC.
Hard disk images
To introduce Mac OS X on the emulator, you will require a iso file. You can download preformatted files from http://pearpc.net/downloads.php. There are two files available on network: 3GB and 6GB.I used 6GB file, however in case you have limited space then you can choose 3GB file.
You can burn the copy of Mac OS X ISO using Nero or any other disk save utility software.
How to configure PearPC
Launch PearPC Control Panel and click on the Create New Configuration File icon. Now, you will see the first screen as shown in Picture#1. Please click on "Continue" button to proceed to the next step or check how to right click on a Mac.
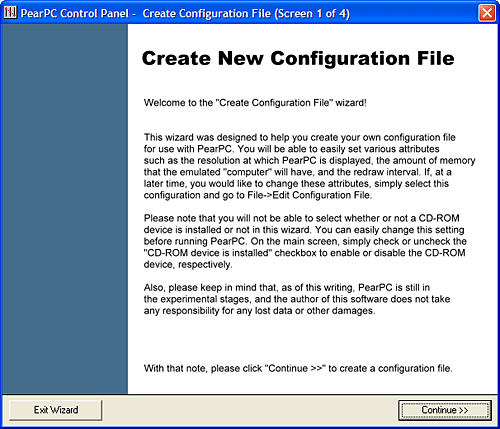
Picture #1. Using Create New Configuration File wizard
In the following screen, you need to supply information (see Picture #2 ). To start with, indicate the location of the PearPC emulator. In my case, it is C:\PearPC\ppc.exe.
Next, specify the location of the hard disk image, i.e. C:\PearPC\macosx_6gb.img.
Also, set the amount of memory, you want to set for Mac OS X. (I have allocated as 255MB.) Then, click on "Continue" button.
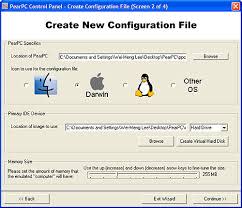
Picture #2. Using Create New Configuration File wizard
In the following screen, you have to provide options for screen resolution and color depth. When you input the information, you can click on "Finish" button (as shown in Picture #3).
Note: I tried to check enable networking option, but I never got that working. Also, please use G3 and not G4 CPU emulation.
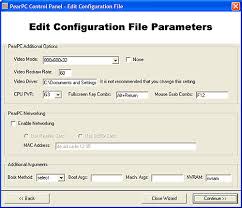
Picture #3. Specify additional options
The final step, you can give a name to the configuration file and save the file on specific location (as shown in Picture# 4). Press on "Finish" button.
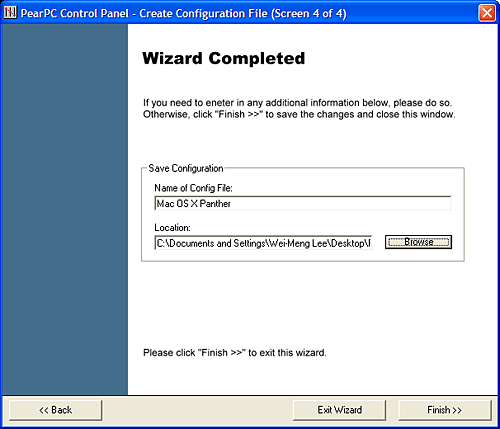
Picture #4. Wizard complete screen
You can now see the icon for Mac OS X Panther in your PearPC Control Panel windows (as shown in Picture# 5). Now, you need to complete one last step before you start installing Mac OS X on the PC. Please check the "CD-ROM device is installed" option is checked and specify the location of the Mac OS X (i.e. C:\PearsPc\ MyPanther.iso) install disk image. This image will be used to boot up the PearPC emulator.
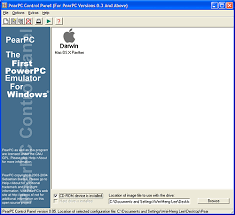
Picture#5. Completed configuration file
You are done with the configuration file! Now, double click on the Mac OS X Panther symbol and you will see the PearPC window pop up (see Picture#6). Your Mac OS X establishment ought to begin soon a while later.
Note: It took me reasonably a while to get my Mac OS X installation. I encountered a number of failed attempts - when I booted into Mac OS X, it prompted me to restart my machine. But after several attempts, it worked.
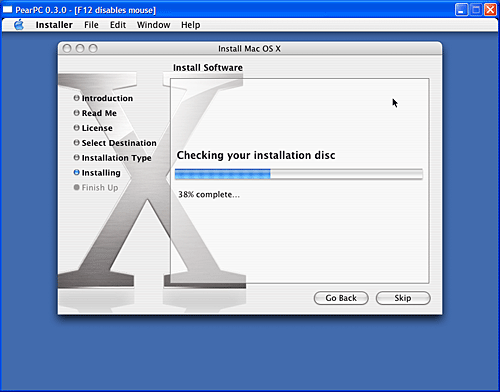
Picture#6. Installing Mac OS X
Note: It took me a long time to get my Mac OS X to introduce. I experienced various failed attempts, but finally I'm able to boot Mac OS X. Of course, I have to restart my machine.
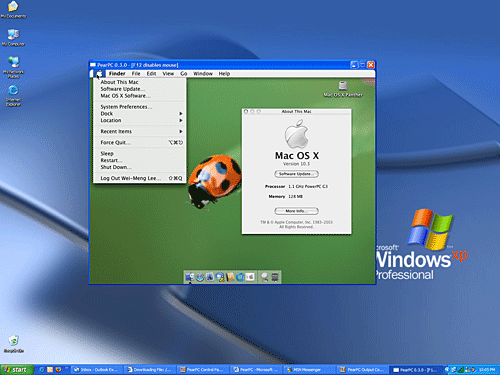
If you still doubt, given at the top is the screen shot that will confirm that I am running Mac OS X on my PC. Hope above steps will work with you and you are able to enjoy Mac OS on your windows. Best of luck!!!
